Land Rover Discovery: General Information Brake System Pressure Bleeding (G1785101) / General Procedures
BLEEDING
NOTE:
Some variation in the illustrations may occur, but the essential information is always correct.
All vehicles
WARNING:
Make sure to support the vehicle with axle stands.
Raise and support the vehicle.
Check that the brake fluid lines are secure and that there are no signs of a brake fluid leak. If a brake fluid leak is detected, investigate and rectify the cause of the leak before bleeding the brakes.
Right-hand drive vehicles
.jpg)
Left-hand drive vehicles
.jpg)
All vehicles
CAUTION:
LH illustration shown, RH is similar.
.jpg)
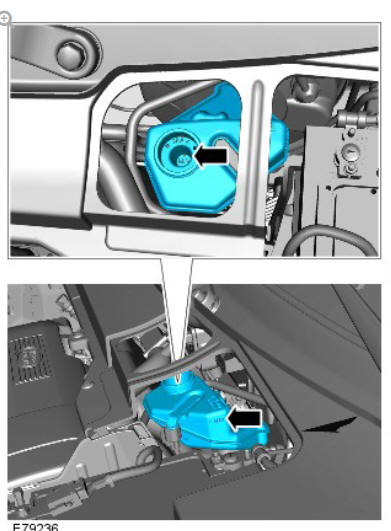
Remove the brake fluid reservoir cap.
WARNING:
Do not allow dirt or foreign liquids to enter the reservoir. Use only new brake fluid of the correct specification from airtight containers. Do not mix brands of brake fluid as they may not be compatible.
CAUTIONS:
- Brake fluid will damage paint finished surfaces. If spilled, immediately remove the fluid and clean the area with water.
- The brake fluid reservoir must remain full with new, clean brake fluid at all times during bleeding.
- LH illustration shown, RH is similar.
.jpg)
Fill the brake fluid reservoir to the MAX mark.
Conduct the bleed procedure with the engine running.
Install the bleed tube to the brake caliper bleed screw and immerse the free end of the bleed tube in a bleed jar containing a small quantity of approved brake fluid.
Left-hand drive vehicles
.jpg)
Starting at the brake caliper furthest away from the brake master cylinder, loosen the bleed screw by one-half to three-quarters of a turn.
Right-hand drive vehicles
.gif)
All vehicles
CAUTION:
The brake fluid reservoir must remain full with new, clean brake fluid at all times during bleeding.
With assistance, depress the brake pedal steadily through to 2/3 of its full stroke.
With the brake pedal held down, close bleed screw and then return the brake pedal to 1/3 of its full stroke and hold.
Repeat steps 7 and 8, 28 times for the rear brake and 10 times for the front brake.
At the end of the bleed process, depress and hold the brake pedal down.
CAUTION:
Make sure the bleed screw cap is installed after bleeding.
This will prevent corrosion to the bleed screw.
With the brake pedal fully depressed, tighten the bleed screw.
Torque:
Front bleed screw 15 Nm
Rear bleed screw 15 Nm
CAUTION:
LH illustration shown, RH is similar.
Fill the brake fluid reservoir to the MAX mark.
WARNING:
Braking efficiency may be seriously impaired if an incorrect bleed sequence is used.
Repeat the brake bleeding procedure for each brake caliper, following the above sequence.
CAUTION:
LH illustration shown, RH is similar.
.jpg)
Install the brake fluid reservoir cap.
Apply the brakes and check for leaks.
Right-hand drive vehicles
.jpg)
Left-hand drive vehicles
.jpg)
READ NEXT:
 General Information Front Brake Disc Runout Check (G2010035) / General
Procedures
General Information Front Brake Disc Runout Check (G2010035) / General
Procedures
SPECIAL TOOL(S)
CHECK
NOTES:
Some variation in the illustrations may occur, but the essential
information is always correct.
Left shown, Right is similar.
WARNING:
Make sure to support the vehi
General Information Rear Brake Disc Runout Check (G2010036) / General
Procedures
SPECIAL TOOL(S)
CHECK
NOTES:
Some variation in the illustrations may occur, but the essential
information is always correct.
Right shown, left is similar.
It is not necessary to carry out the p
General Information / Diagnosis and Testing
PRINCIPLES OF OPERATION
For a detailed description of the Brake System, refer to the relevant
Description and Operation section in the workshop manual. REFER to:
Hydraulic Brake Actuation (206-06 Hydr
SEE MORE:
Power Bbrake Actuation / Description and Operation
COMPONENT LOCATION
BRAKE BOOSTER COMPONENT LOCATION
NOTE:
Right Hand Drive (RHD) illustrations shown, Left Hand Drive (LHD)
illustrations similar
TD4 2.2L Engine with Stop/Start
Brake booster
Brake vacuum switch
Brake booster connector
Vacuum pipe
Non-return valve
Vacuum pump
TD4 2.2L Engi
Sitting in the correct position
The driver and front seat
passenger must not ride with the
seat fully reclined.
Do not adjust the seat while the
vehicle is moving.
The seat, head restraint, seat belt and
airbags, all contribute to the protection of
the user. Correct use of these components
will give you greater protection. Theref
