Land Rover Discovery: Rear View Mirrors - Operation
AUTOMATIC DIMMING REAR VIEW MIRROR
Power for the feature(s) in the automatic dimming rear view mirror is provided in power mode 6 (ignition).
Automatic Dimming
The light sensor in the front of the mirror monitors ambient light at the front of the vehicle and the light sensor in the rear of the mirror monitors the light coming from behind the vehicle. When the light from behind the vehicle exceeds the ambient light level, the automatic dimming circuits darken the rear view mirror.
Automatic dimming is inhibited when reverse gear is selected, to provide the driver with maximum vision. The reverse gear signal is provided by a battery voltage signal from the reverse relay in the CJB.
HOMELINK UNIVERSAL TRANSMITTER
WARNING:
Before programming HomeLink to a garage door opener or gate operator, make sure that people and objects are out of the way of the device to prevent potential harm or damage.
NOTES:
- Garage door openers manufactured after 1996 may be equipped with rolling code protection feature. If this is the case, you may need a stepladder or other sturdy, safe device to reach the 'Learn' or 'Smart' button on the garage door opener.
- When programming a garage door opener, it is advised to park outside of the garage.
- Additional HomeLink information can be found at. If additional programming support is needed, please call the toll-free HomeLink Hotline at 1-800-355-3515.
- Please note that the instructions below apply to the majority of HomeLink use cases. However, there are some HomeLink applications or HomeLink compatible systems that require slightly different instructions. For more information and for custom training instructions specific to your device.
- HomeLink is a registered trademark owned by GENTEX CORPORATION.
The HomeLink wireless control system provides a convenient way to replace up to three hand-held Radio Frequency (RF) transmitters used to activate devices such as gate operators, garage door openers, entry door locks, security systems, even home lighting.
PROGRAMMING HOMELINK UNIVERSAL TRANSMITTER
NOTE:
It is recommended that a new battery be placed in the hand-held transmitter of the device being programmed to HomeLink for quicker training and accurate transmission of the Radio Frequency (RF) signal.
Step 1
Turn the ignition On.
Step 2 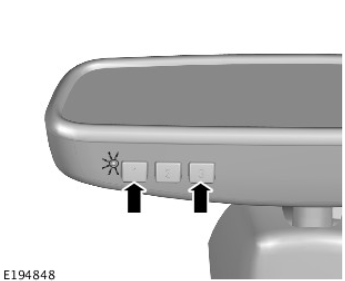
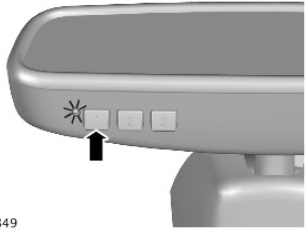
Press and hold the outer two switches of the HomeLink universal transmitter until the status indicator begins to flash.
Step 3
Release the swiches.
This initializes the HomeLink universal transmitter and erases previous settings from all three channels.
Step 4 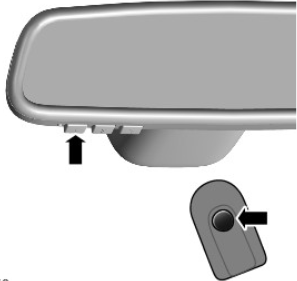
Place the signal emitting end of the hand held transmitter 2 - 8 cm (1 - 3 inches) away against the underside of the rear view mirror. Keep the status indicator in view.
Simultaneously press and hold the activation switch on the hand held transmitter and the chosen switch of the HomeLink universal transmitter.
The status indicator begins to flash slowly.
NOTE:
Do not release the buttons until the following step has been completed.
Step 5
The status indicator begins to flash rapidly. This can take up to 60 seconds.
Step 6
Release both switches.
Step 7 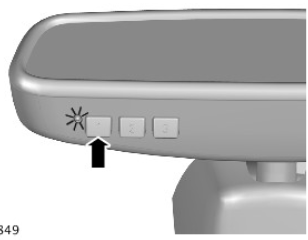
Press the programmed HomeLink universal transmitter switch. The solid status indicator light indicates the successful programming.
To program another channel on the HomeLink universal transmitter, repeat Steps 4 to 7.
Step 8
Turn the ignition Off.
To operate the previously programmed device, press and hold the chosen switch of the HomeLink universal transmitter. Release the switch when the device begins to operate.
PROGRAMMING HOMELINK UNIVERSAL TRANSMITTER - DEVICES WITH CODE PROTECTION FEATURE
The Radio Frequency (RF) signals used to operate some home/office systems incorporate a code protection feature. After a channel has been programmed from the hand held transmitter, these systems will need to be trained to accept the signal from the HomeLink universal transmitter. To check if a system is code protected, operate the appropriate HomeLink universal transmitter switch. If the status indicator flashes rapidly for 1 to 2 seconds before illuminating permanently, the system has a code protection feature.
Locate the 'Learn' or 'Smart' button at the garage door opener receiver (motor-head unit) in the garage before performing the following steps. This can usually be found directly on the motor-head unit (see the Garage Door Opener manual to identify the 'Learn Button').
Step 1
Turn the ignition On.
Step 2 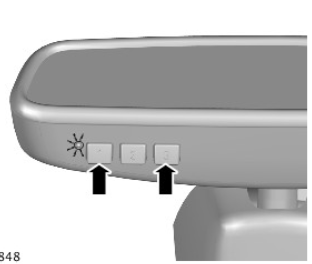
Press and hold the outer two switches of the HomeLink universal transmitter until the status indicator begins to flash.
Step 3
Release the swiches.
This initializes the HomeLink universal transmitter and erases previous settings from all three channels.
Step 4 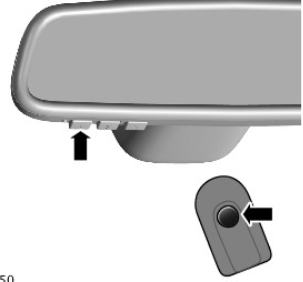
Place the signal emitting end of the hand held transmitter 2 - 8 cm (1 - 3 inches) away against the underside of the rear view mirror. Keep the status indicator in view.
Simultaneously press and hold the activation switch on the hand held transmitter and the chosen switch of the HomeLink universal transmitter.
The status indicator begins to flash slowly.
NOTE:
DO NOT release the buttons until the following step has been completed.
Step 5
The status indicator begins to flash rapidly. This can take up to 60 seconds.
Step 6
Release both switches.
Step 7 
Press and release the 'Learn' or 'Smart' switch at the garage door opener receiver. The name and color of the switch may vary by manufacturer.
After the 'Learn' or 'Smart' switch has been released, a status indicator on the garage door opener receiver will continously lit.
Step 8
NOTE:
Perform the following step within 30 seconds.
Return to the vehicle and press and hold the chosen switch of the universal transmitter for 3 seconds to activate the device. Repeat this step up to three times to complete the training.
If the device activates, programming is complete.
Step 9
Turn the ignition Off.
To operate the previously programmed device, press and hold the chosen switch of the universal transmitter. Release the switch when the device begins to operate.
READ NEXT:
 Door Mirrors
Heating
There are 2 modes of heated door mirror operation; manual and automatic.
Manual operation is activated by pressing the Heated Rear Window (HRW)
switch . When the switch is pressed, the status
Rear View Mirrors
/ Diagnosis and Testing
PRINCIPLES OF OPERATION
For a detailed description of the Rear View Mirrors, refer to the relevant
Description and Operation section in the workshop manual. REFER to:
Interior Rear View Mirror (501-09
SEE MORE:
Front Safety Belt
Buckle (G1780743) / Removal and
Installation
REMOVAL
WARNINGS:
To avoid accidental deployment and possible personal injury,
the
backup power supply must be depleted before repairing or
replacing any air bag supplemental restraint system (SRS)
components. To deplete the backup power supply energy,
disconnect the battery ground cable and
Side Panel Sheet
Metal Repairs 'A'
Pillar Outer
Panel (G1770902) -
Installation
Installation
Dress the flanges where necessary.
Mark out the position on the new A-pillar outer panel where the
upper and lower Metal Inert Gas (MIG) welded butt joints are to be
made. Cut through the new panel as indicated.
Offer up the new A-pillar outer panel and clamp into position.
