Land Rover Discovery: Access position (7 seat vehicle)
The vehicle must not be driven with the rear seats in the access position. Motion of the vehicle could cause the seatback to fall forwards suddenly, causing injury.
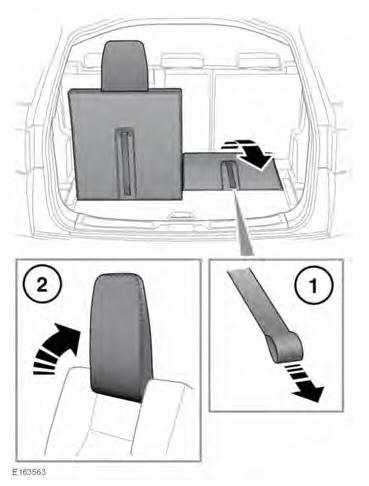
To tilt the seatback forwards: Pull the lever on the top of the seatback upwards (1) to release the locking mechanism, and then move the seatback forwards into the tilt position.
To move the seat forwards: Pull the lever on the front of the seat upwards (2) to release the locking mechanism, and then move the seat forwards.
When returning the seat from the access position, make sure nothing is trapped beneath the returning seat.
Make sure that when the seatback and seat are returned to the pre-access position, the locking mechanisms are fully engaged.
Physically test to make sure that the seat and seatback is secure before driving.
FOLDING AND RAISING THE THIRD ROW SEATS
The head restraint must always be raised when using the third row seats.
When raising the rear seats, make sure that seat belts are correctly routed and not trapped behind the seats.
Beware of trapping fingers when raising and lowering the third row seat.
To raise a third row seat:
- From inside the loadspace: On the seat to be raised, pull the strap on the rear of the seat, to lift the seat into the raised position.
Note: The seat is heavy, so care should be taken when raising the seat.
- From inside the vehicle: Lift the head restraint, until it locks into the upright position.
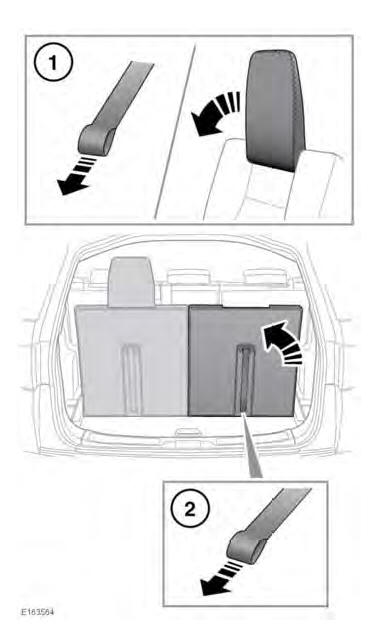
To fold a third row seat:
- From inside the loadspace: Pull the strap on the rear of the seat to be folded, to release the head restraint locking mechanism and then manually fold the head restraint forward.
- To fold the seat: Pull the strap again to release the seat locking mechanism, and then fold the seat forwards into the stowed position.
Note: The seat is heavy, so care should be taken when lowering the seat.
READ NEXT:
 Head restraints
FRONT HEAD RESTRAINTS
Adjust the head restraint so that
the top of the head restraint is
above the centre line of the head.
An incorrectly adjusted head
restraint increases the risk of
death or serio
Steering wheel
ADJUSTING THE STEERING WHEEL
Never adjust the steering column
while the vehicle is in motion.
Move the lever fully down to unlock
the column. When the steering has
been adjusted to the desired p
SEE MORE:
Engine Cooling - Ingenium i4 2.0l Diesel Cooling Fan Motor and Shroud
(G1879558)/ Removal and Installation
REMOVAL
WARNING:
Cooling fans may continue to operate after the engine is turned off.
They may also start to operate after the engine is turned off and
continue operating for up to 10 minutes.
CAUTION:
Be prepared to collect escaping coolant.
NOTES:
Some variation in the illustrations may occur,
Rear Door Latch (G1791774)
/ Removal and
Installation
REMOVAL
NOTES:
Removal steps in this procedure may contain installation details.
Some variation in the illustrations may occur, but the essential
information is always correct.
Refer to: Rear Door Trim Panel (501-05 Interior Trim and
Ornamentation, Removal and Installation).
Refer to: Exterior
