Land Rover Discovery: Left Steering Column Multifunction Switch
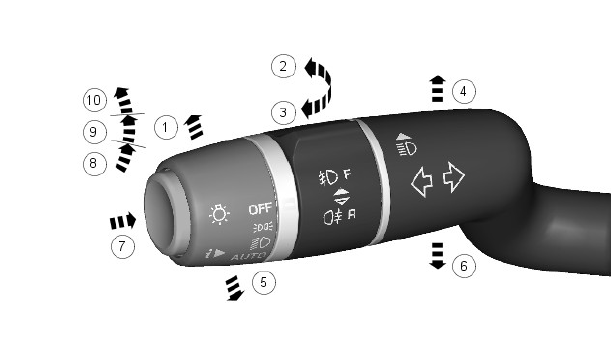
- High beam
- Front fog lamp
- Rear fog lamp
- Right turn signal indicator
- Headlamp high beam flash
- Left turn signal indicator
- Trip computer information
- Side lamp
- Low beam
- Autolamps on
The left steering column multifunction switch allows the following selections:
- All exterior lamps off
- Side lamps on
- Low beam headlamps on
- Autolamps activation
- Headlamp low/high beam
- Headlamp high beam flash
- Left/right turn signal indicators
- Front/rear fog lamps
- Trip computer functions.
The multifunction switch positions are all connected via a resistive ladder.
The output from the resistive ladder is connected to the clockspring which converts the switch operation to LIN bus signals. The signals are received by the CJB which operates the required exterior lighting selection.
Fog Lamps
The fog lamps are controlled by a rotary, non-latching switch on the left steering column multifunction switch. The switch is a momentary switch in both positions for front and rear fog lamps. The front and rear fog lamps can be selected individually. Movement of the switch in either direction will activate or deactivate the selected fog lamps. When active, the fog lamps will remain on until deselected using the fog lamp switch or the headlamps are switched off or when the ignition is in auxiliary power mode 4 or lower.
The applicable Instrument Cluster (IC) warning indicators will illuminate when the fog lamps are active.
Autolamps
The (AUTO) autolamp function is a driver assistance system. The driver can override the system operation by selection of side lamp or low beam headlamp on.
The automatic headlamp system uses a rain/light sensor which is connected to the CJB via a LIN bus. The CJB reacts to the signals from the rain/light sensor and activates the exterior lamps as required.
The light sensor is incorporated in the rain/light sensor located on the inside of the windshield, below the rear view mirror. The wiper system also uses the rain/light sensor for automatic wiper operation.
For additional information, refer to: Wipers and Washers (501-16 Wipers and Washers, Description and Operation).
The light sensor measures the ambient light around the vehicle in a vertical direction and also the angular light level from the front of the vehicle. The rain/light sensor uses vehicle speed signals, wiper switch position and the park position of the front wipers to control the system.
- Twilight
- Darkness
- Rain
- Tunnels
- Underground or multistoried car parks.
Operation of the autolamps requires the ignition to be on (power mode 6 or above), the left steering column multifunction switch to be in the 'AUTO' position and a lights on request signal from the light sensor. When the 'AUTO' system is active, the side lamp warning indicator in the Instrument Cluster (IC) will be illuminated.
High Beam On and Flash Functions
The high beam is operated by pushing the left steering column multifunction switch towards the instrument panel. The switch will latch in the high beam position. When the high beam headlamps are active, the high beam warning indicator will illuminate in the IC.
The high beam flash function is operated by pulling the left steering column multifunction switch away from the instrument panel. The non-latching switch will operate the high beam headlamps for as long as the switch is held. The switch will return to the high beam off position when released.
The high beam warning indicator will illuminate when the high beam headlamps are active.
High beam can also be automatically operated by the Image Processing Control Module (IPCM) system (when fitted), see below.
Turn Signal Indicators
The left and right turn signal indicators are operated by moving the left steering column multifunction switch up or down to select right or left turn signal indicators respectively. The switch will latch in each position.
The switch has a turn signal indicator lane change function which is configurable by the dealer. If the switch is gently pushed, but not latched, to either turn signal indicator position and then released, the applicable turn signal indicators will flash 3 times and then will be automatically cancelled.
If a turn signal indicator fails, the green turn signal warning indicator in the Instrument Cluster (IC) will flash at twice the normal rate and the audible ticking from the IC sounder will also be at twice the normal rate.
Side Lamps and Headlamps
The side lamps and headlamps are selected by a rotary switch on the left steering column multifunction switch.
Rotating the switch from the off position to the side lamps position illuminates the front side lamps, the tail lamps, the license plate lamps and the instrument panel illumination.
Rotating the switch to the headlamps position, switches on the headlamps in addition to the lamps illuminated by the side lamp position.
Autolamps
Autolamps is selected by rotating a rotary switch on the left steering column multifunction switch to the 'AUTO' position. When the lighting control switch is in the 'AUTO' position, a reference voltage from the CJB flows through 4 resistors in the lighting control switch. The returned signal voltage is detected by the CJB which activates the auto headlamp function to activate the headlamps and front and rear side/tail lamps.
The rain/light sensor receives a battery voltage output from the ignition relay in the CJB. The rain/light sensor continually outputs a LIN bus message to the CJB with information regarding the ambient light levels.
When the ambient light level reaches a predetermined value, the CJB activates the Autolamps feature. The CJB can also activate the Autolamps when it receives information regarding rain fall from the rain/light sensor which subsequently activates the auto wipers function.
READ NEXT:
 Front Fog Lamps
LED light source
Lens
Attachment holes
Electrical connector
The two front fog lamps are available as an option or standard fitment on
vehicles fitted with xenon headlamps and headlamp washer j
Hazard Warning Lamps
The hazard warning lamps are controlled by a non-latching switch in the
centre of the instrument panel. The hazard warning lamps operate at all
times when selected and are not dependent on the ignitio
Central Junction Box
The CJB controls the exterior lighting system through interconnections as
follow:
Left steering column multifunction switch
Side lamp position
Low beam position
Automatic ('AUTO') position (if fi
SEE MORE:
Fuel Charging and Controls
- Turbocharger - Ingenium i4
2.0l Diesel Turbocharger (G1875964)
/ Removal and Installation
REMOVAL
NOTES:
Some components shown removed for clarity.
Some variation in the illustrations may occur, but the essential
information is always correct.
Removal steps in this procedure may contain installation details.
Refer to: Specifications (414-01 Battery, Mounting and Cables,
Specificati
Power Steering Diagnosis and
Testing - Inspection and Verification
PRINCIPLES OF OPERATION
For a detailed description of the Power Steering, refer to the relevant
Description and Operation section in the workshop manual. REFER to:
Power Steering (211-02 Power Steering, Description and Operation).
Inspection and verification
CAUTION:
Diagnosis by substitution from a
