Land Rover Discovery: Manual climate control
Land Rover Discovery (2009–2016) Owner's Manual / Heating and ventilation / Manual climate control
Note: When Eco program is selected, heating and ventilation settings are automatically adjusted to reduce energy consumption.
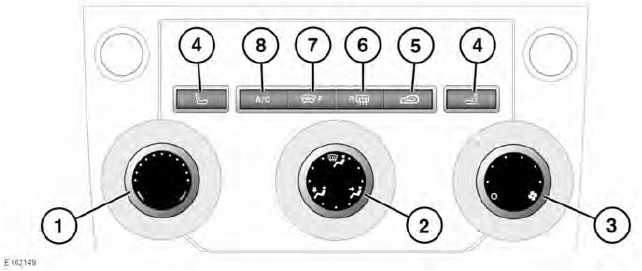
- Temperature control: Rotate to adjust.
- Air distribution: Rotate to direct air flow to the required areas.
- Blower speed: Rotate to adjust air flow speed through the vents.
- Seat heaters: Press once to switch on high, twice to switch on medium, and a third time to switch on low. Press a fourth time to switch off.
- Recirculation:
- Press briefly to switch on recirculation.
Note: The recirculation operation time will vary depending upon the ambient temperature.
- Press and hold to switch on continuous recirculation.
- When recirculation is in operation, press briefly to switch off.
- Heated rear screen: Press to switch on/off.
- Heated windscreen: Press to switch on/off.
- Air conditioning: Press to switch on/ off.
Note: The amber tell-tale indicators in the switches will illuminate when the function is selected. Note: In low temperatures, it is advisable to close the centre face-level vents, and direct air flow from the outer face-level vents towards the side windows. This will help to keep the windows clear of ice.
READ NEXT:
 Automatic climate control
Note: The Climate control system
removes moisture from the air and
deposits the excess water beneath the
vehicle. Puddles may form, but this is
normal and is no cause for concern.
Note: The LED indi
Climate settings
To view the CLIMATE SETTINGS menu,
select Climate from the GENERAL
SETTINGS menu.
Auto Sensitivity: The air quality
sensor, for Automatic recirculation, can
be set to Low, Medium or High. Select
Heated seats
Note: Heated seats consume a great
amount of battery power. They will only
operate when the engine is running.
If the Heated seat/s are operating when
the ECO program is selected, the Heated
seat/s w
SEE MORE:
Rear Drive Axle - Differential - Vehicles with- Active Driveline Drive Pinion
Flange (G1781296) - Installation
Installation
CAUTION:
Make sure new bolts are installed.
Renew Part: Differential case front bolts.
Refer to: Fuel Tank (310-01A Fuel Tank and Lines - TD4 2.2L Diesel,
Removal and Installation).
Refer to: Fuel Tank (310-01A Fuel Tank and Lines - TD4 2.2L Diesel,
Removal and Installation).
CAUTION
Advanced emergency brake assist
The system may not react to slow
moving vehicles and will not react
to stationary vehicles or vehicles
travelling in the opposite direction.
Warnings may not appear if the
distance to the vehicle ahead is very
small or if steering wheel or pedal
movements are large (e.g., to avoid
a collis
© 2019-2026 Copyright www.lrdisc.com
