Land Rover Discovery: Media settings
To view the MEDIA SETTINGS menu, select Media from the GENERAL SETTINGS menu.
The MEDIA SETTINGS menu contains the following options:
- Traffic Announcement. Swtich on/off.
- Sound: Select to view the SOUND SETTINGS.
- Radio: These setting options are dependent on the radio source selected.
SOUND SETTINGS
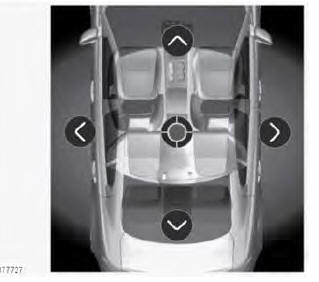
To adjust the Balance/Fader settings: Touch the arrows to move the sound focal point to the desired area of the vehicle.
Alternatively, touch the sound focal point and drag it to the required position or touch anywhere on the vehicle graphic and release. To return to the default setting, touch the sound focal point.
To adjust the Bass/Mid/Treble settings:
Touch the arrows to move the sound focal point to the desired area of the vehicle.
Alternatively, touch the sound focal point and drag it to the required position or touch anywhere on the vehicle graphic and release. To return to the default setting, touch the sound focal point.
To adjust the Bass/Mid/Treble settings:
- Touch + or - to adjust the Bass, Mid or Treble levels. Alternatively, touch the slider bar and drag or touch anywhere on the bar and release.
To switch between Balance/Fader and
Bass/Mid/Treble settings: .gif)
- Touch the icon to move from the Bass/ Mid/Treble screen to the Balance/ Fader screen.
- Touch the icon to move from the Balance/Fader screen to the Bass/ Mid/Treble screen.
To adjust the Speed dependent volume, select from the following options: Off, Low, Mid or High.
READ NEXT:
 AM/FM Radio controls
Stations: Touch to select the station
list for the chosen radio source.
Source: Touch to select the media
source list.
Status icons: When a phone is
connected, the battery level and
network
DAB Radio controls
Stations: Touch to select the station
list for the selected waveband.
Source: Touch to select the media
source list.
Status icons: When a phone is
connected, the battery level, and
network s
Portable media connections
Portable media devices can be connected
to the media hub, located in the cubby
box. Compatible portable devices include:
USB mass storage devices (e.g., a
memory stick). Devices must use FAT
or FA
SEE MORE:
Side Panel Sheet
Metal Repairs 'A'
Pillar Outer
Panel (G1770902) - Removal
NOTE:
The A-pillar outer panel is installed in conjunction with:
Front bumper cover
Hood
Front fender
Fender splash shield
Front door
Instrument panel
Windshield glass
Headliner
Side air curtain module
Front scuff plate trim panel
A-pillar trim panel
Front seat
The A-pillar outer p
Dynamic
This program is associated with
a driving style, rather than a
type of terrain and optimises
traction, handling and
driveability, for maximum
feedback and responsiveness.
Select this program to exploit
the vehicle's full on-road
potential.
DRIVER OVERRIDE OPTIONS
Hill Descent Control (HDC) is autom
