Land Rover Discovery: Rear direction indicator and reversing lamp bulb replacement
Land Rover Discovery (2009–2016) Owner's Manual / Maintenance / Rear direction indicator and reversing lamp bulb replacement
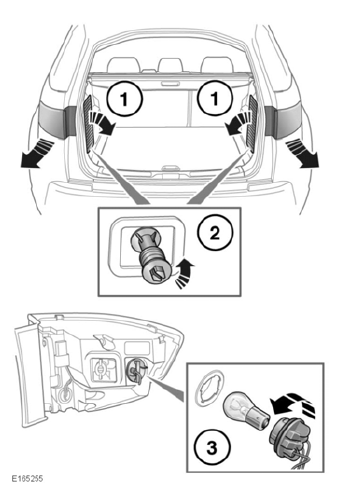
Replacing a rear direction indicator:
- Remove the appropriate loadspace vent door.
- Rotate the rear lamp's retaining screw counter-clockwise, until fully released and then remove. This allows the rear lamp unit to be withdrawn.
- At the back of the rear lamp unit, rotate the bulb holder counterclockwise and pull to access the indicator bulb.
Reverse the removal procedure to install a bulb holder/bulb unit.
Note: Note the orientation of any removed components to aid refitting.
Replacing a reversing lamp bulb:
- Remove the appropriate tailgate access door.
- Rotate the bulb holder downwards.
Pull to remove the holder from the lamp unit and access the reversing bulb.
Reverse the removal procedure to install a bulb holder/bulb unit.
Note: Note the orientation of any removed components to aid refitting.
READ NEXT:
 Wipers service position
To avoid damage to the bonnet, do
not lift the wiper blades when they
are in the normal parked position.
Note: The Smart key must remain in the
vehicle while the wiper blades are
replaced.
Before chan
The exterior
Following cleaning of the vehicle's
exterior (particularly with a
pressure washer), it is
recommended that the vehicle is
taken for a short drive to dry out
the brakes
To prevent damage to your vehi
SEE MORE:
Torque Converter - Ingenium i4 2.0l Diesel (G1894240)
/ Removal and Installation
SPECIAL TOOL(S)
REMOVAL
WARNING:
Be prepared to collect escaping fluid.
NOTE:
Some variation in the illustrations may occur, but the essential
information is always correct.
WARNING:
Make sure to support the vehicle with axle stands.
Raise and support the vehicle.
Refer to: Transmission - INGENIUM
Vehicles Without Auto
Stop / Start
System
Engine cranking is requested when the stop/start switch is pressed and the
driver has depressed the brake pedal. When engine cranking is requested,
the ECM checks that a valid key code has been received and the
transmission is in Park (P) or Neutral (N) before granting the crank request.
Once engine
© 2019-2026 Copyright www.lrdisc.com
