Land Rover Discovery: Tow bar dimensions and mounting points
Land Rover Discovery (2009–2016) Owner's Manual / Towing / Tow bar dimensions and mounting points
5 seat vehicles and 7 seat vehicles without a spare wheel
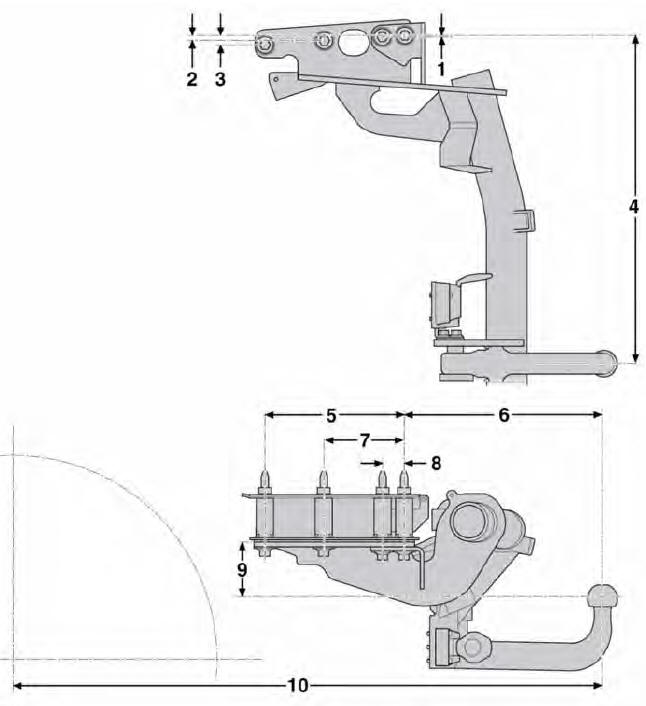

Note: Dimensions refer to towing equipment officially released by the vehicle manufacturer.
7 seat vehicles with a spare wheel
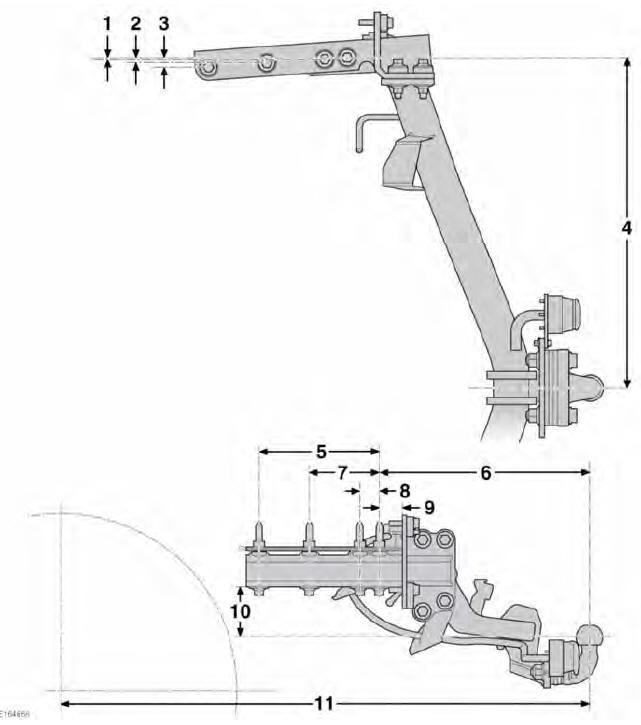
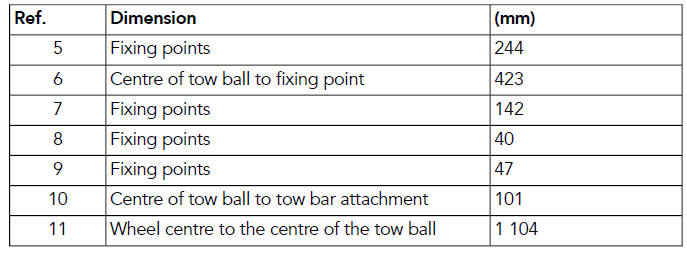
Note: Dimensions refer to towing equipment officially released by the vehicle manufacturer.
READ NEXT:
 Starting the engine
STARTING THE ENGINE
Never start the engine, or leave
it running, when the vehicle is in
an enclosed space. Exhaust gases
are poisonous and can cause
unconsciousness and death if
inhaled.
If the engine
Switching off the engine
To switch off the engine while the vehicle
is stationary:
Apply the Electric Parking Brake (EPB).
Mark sure that Park (P) (automatic
transmission) or Neutral (N) (manual
transmission) is selected
Keyless start backup
If the vehicle is unlocked using the
emergency key blade, or the Smart key is
not detected by the vehicle, it will be
necessary to use the Keyless start backup
feature to disarm the alarm and start th
SEE MORE:
Two-post Lift
WARNING:
Make sure that the vehicle is stable before commencing work.
CAUTION:
If the drive shaft(s) are to be removed, release the parking brake and
select NEUTRAL 'N' in the transmission in order that the shaft(s) can
be rotated when the vehicle is raised to the desired height.
Position the vehi
Wiper Pivot Arm (G1780362) / Removal and Installation
REMOVAL
NOTES:
Removal steps in this procedure may contain installation details.
LHD illustration shown, RHD is similar.
CAUTION:
Note the installed position of the component prior to
removal.
Torque: 25 Nm
NOTE:
Do not disassemble further if the component is removed for
access only.
INSTA
© 2019-2026 Copyright www.lrdisc.com
