Land Rover Discovery: Airbag service information
- Phone systems should only be installed by qualified persons familiar with the operation of, and requirements for, vehicles fitted with a Supplementary Restraint System (SRS). If you are in any doubt, seek advice from your Retailer/Authorised Repairer.
- Do not attempt to service, repair, replace, modify, or tamper with, any part of the SRS. This includes wiring or components in the vicinity of SRS components. Doing so may cause the system to trigger, or render the system inoperative.
- Do not use any electrical test equipment or devices in the vicinity of SRS components or wiring. Doing so may cause the system to trigger, or render the system inoperative.
- For your safety, all of the following operations should only be carried out by a Retailer/ Authorised Repairer, or suitably qualified person:
- Removal, or repair, of any wiring or component in the vicinity of any SRS components.
- Fitment of electrical, or electronic, equipment and accessories.
- Modification to the front or sides of the vehicle's exterior.
- Attachment of accessories to the front or sides of the vehicle.
Always contact your Retailer/Authorised Repairer if:
- An airbag inflates.
- The front or sides of the vehicle are damaged.
- Any part of the airbag SRS shows signs of cracking or damage, including the trim covering the airbags.
DISABILITY MODIFICATIONS
Occupants with disabilities which may require the vehicle to be modified, must contact a Retailer/Authorised Repairer before any modifications are made.
PEDESTRIAN AIRBAG
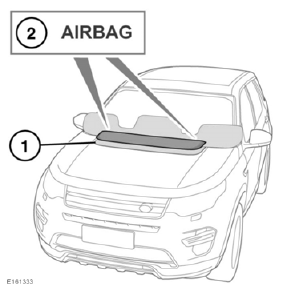
your vehicle is fitted with a Pedestrain airbag, it is located beneath a panel in the bonnet (1).
To verify that a Pedestrian airbag is fitted to the vehicle, the word AIRBAG is located in 2 places on the rear of the panel (2).
In the event of a frontal impact with a pedestrian, sensors in the front bumper react and the Pedestrian airbag inflates.
The sensors will operate at speeds between 25 to 50 km/h (15.5 to 31 mph).
If there is a fault with the Pedestrian airbag, the message Check Pedestrian System will appear in the Message centre.
In this event, the vehicle should be taken to a Retailer/Authorised Repairer to have the fault investigated.
- Do not carry out any modifications to the front bumper, or fit any accessories to the bumper or the bonnet, that has not been approved by Jaguar Land Rover, as this could affect the operation of the sensors and/ or the airbag.
- If damage of any kind is sustained to the front bumper, this should be inspected by a Retailer/ Authorised Repairer as soon as possible.
For instructions on what to do after a collision where the Pedestrian airbag has deployed.
READ NEXT:
 Instrument panel
Speedometer.
Tachometer.
Message centre and menu display.
Fuel gauge
As a reminder for the location of the
fuel filler, there is an arrow next to the
fuel pump symbol pointing to the
relevant
Instrument panel menu
A number of vehicle features and display
settings may be configured via the
Instrument panel menu.
To display and navigate through the
Instrument panel menu, operate the menu
control on the steerin
Using the trip computer
The Trip computer is able to display
various pieces of information to the driver.
A short press (1 second or less) of the i
button will display the Trip computer
menu in the Instrument panel. The o
SEE MORE:
Piston Cooling Oil
Jets Solenoid
The piston cooling oil jets solenoid is located on the left side of the
cylinder
block, below the thermostat housing. The solenoid is located in a port in the
cylinder block and sealed with an O-ring seal. A screw secures the solenoid
in the cylinder block.
The piston cooling oil jets solenoid c
Steep slopes
If the vehicle is stationary on a steep,
slippery slope, it may begin to slide, even
with the brakes applied. This is because,
without wheel rotation, the Anti-lock
Braking System (ABS) cannot determine
vehicle movement.
To counteract this, briefly release the
brakes to allow some wheel rotation. Th
