Land Rover Discovery: Checking the engine oil level
Land Rover Discovery (2009–2016) Owner's Manual / Fluid level checks / Checking the engine oil level
- Check the engine oil weekly. If any significant or sudden drop in oil level is noted, seek qualified assistance.
- Never allow the oil level to fall below the lower mark or notch on the dipstick.
- If the message ENGINE OIL
PRESSURE LOW is displayed, stop
the engine as soon as it is safe to
do so and seek qualified assistance.
Do not start the engine until the cause has been rectified.
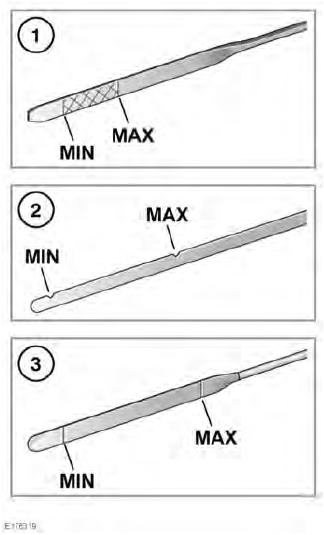
- Engine oil dipstick - 2.0L petrol.
- Engine oil dipstick - 2.2L diesel.
- Engine oil dipstick - 2.0L diesel
The dipstick on 2.0L diesel engines features a lug, to aid correct fitment. Make sure the lug is correctly aligned with the groove in the dipstick tube. Failure to do this could result in the dipstick not fitting correctly, and oil escaping from the engine.
Prior to checking the oil level, make sure that:
- The vehicle is on level ground.
- The engine oil is cold.
Note: If it is necessary to check the oil level when the engine is hot, switch off the engine and let the vehicle stand for 5 minutes to allow the oil to drain back into the sump. Do not start the engine.
The oil level can then be checked as follows:
- Withdraw the dipstick and wipe the blade clean with a lint-free cloth.
- Fully re-insert the dipstick and withdraw again to check the oil level.
As a general guide, if the oil level on the dipstick:
- Is nearer to the upper mark or notch than the lower, do not add oil.
- Is nearer to the lower mark or notch than the upper, add 0.5 litres of oil.
- Is below the lower mark or notch, add:
- 2.0L petrol engine: 0.8 litres of oil.
- 2.2L diesel engine: 1.5 litres of oil.
- 2.0L diesel engine: 1.8 litres of oil.
Recheck the level after a further 5 minutes.
READ NEXT:
 Topping up the oil
Your vehicle's warranty may be
invalidated if damage is caused by
using oil that does not meet the
required specification.
Failure to use an oil that meets the
required specification could caus
Topping up the coolant
Never remove the coolant
reservoir filler cap when the
engine is hot. Escaping steam or
scalding water could cause serious
personal injury.
Unscrew the filler cap slowly,
allowing the pressure
Checking the brake/clutch fluid level
Seek qualified assistance
immediately if brake pedal travel
is unusually long, or if there is any
significant loss of brake fluid.
Driving under such conditions
could result in extended stoppin
SEE MORE:
Rear Drive Axle-
differential - Vehicles without- Active Driveline/
Description and Operation
COMPONENT LOCATION - VEHICLES WITHOUT ACTIVE DRIVELINE
Active on-demand coupling
Rear differential
OVERVIEW
Vehicles without the active driveline system have a conventional mechanical
rear differential. The rear differential has an integrated active on-demand
coupling located on the driveshaft
Rear Disc Brake Brake Caliper Anchor Plate (G1785111) / Removal and
Installation
PART(S)
REMOVAL
NOTE:
Removal steps in this procedure may contain installation details.
Connect the diagnostic tool and set the electronic park brake (EPB)
to the maintenance position
NOTE:
This step is only required if the diagnostic tool is not
available.
Refer to: Electronic Parking Brake
© 2019-2026 Copyright www.lrdisc.com
