Land Rover Discovery: Fitting the detachable tow ball
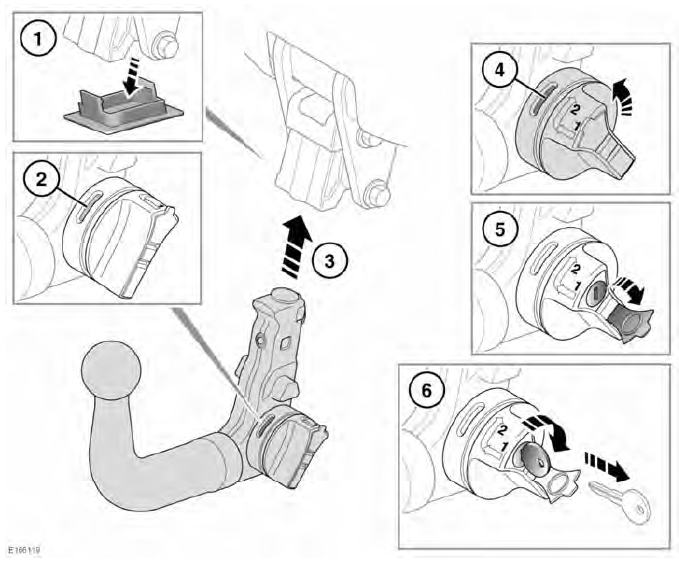
- Remove the protective cover from the vehicle mounting and stow it in the tow ball stowage area.
- The tow ball can only be installed when the locking lever is in the unlocked position (red showing).
- Insert the tow ball into the mounting and push firmly upwards until the tow ball locks into position.
- Turn the locking lever towards you until green is showing.
- Remove the protective cover from the key slot.
- Insert the key and turn it clockwise to lock the tow ball, then remove the key and refit the protective cover. Store the key in a safe place.
Do not exceed the maximum nose weight for the detachable tow ball.
When the detachable tow ball is not required for immediate use, it should be removed and stowed in the appropriate place.
REMOVING THE DETACHABLE TOW BALL
- Insert the key and turn it counterclockwise to unlock.
- Remove the key, then supporting the tow ball, press and turn the locking lever away from you to release.
- Remove the tow ball and stow it in the loadspace stowage area or in the bag provided.
POWERED TOW BALL
Before activating the powered tow ball, make sure that:
- Any trailer is unhitched.
- Any trailer electrical connections are disconnected.
- The vehicle is stationary with the Electric Parking Brake (EPB) applied.
- The tailgate is open.
- The gearbox is in Park (P) or Neutral (N).
If not carried out, any of the above conditions will stop the tow bar from operating. Also a short warning tone will sound if the tow bar button is pressed.
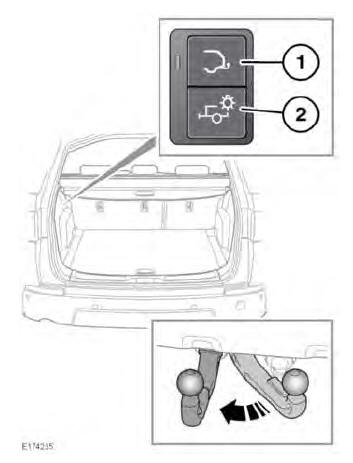
- Press the powered tow ball button to deploy/stow.
The powered tow ball is stowed underneath the middle of the rear bumper. Make sure that no obstructions are in close proximity during operation.
- The button's LED indicator lamp will flash slowly while the powered tow bar is being deployed or stowed, an audible tone will also sound.
- Once deployed, the LED indicator lamp will stop flashing and then illuminate constantly.
- Once stowed, the LED indicator lamp will stop flashing, illuminate for 2 seconds and then extinguish
- To stop movement of the powered tow ball at any time, press the powered tow ball button. Press the button again to reset the tow ball.
- If an obstruction occurs during the
operation of the powered tow ball,
the tow ball movement will stop.
The LED indicator lamp will flash faster, accompanied by a 2 second warning tone. When the obstruction has been cleared, press the tow ball button to reset the tow ball.
- Do not tow when the powered tow ball is not fully deployed. If this does occur, a warning tone will sound for 10 seconds.
- If the tow ball fails to stow in extreme low temperatures, press and hold the powered tow ball button for 10 seconds to initiate the stow operation.
- In the event of an unexpected operation, press the tow ball button to reset the tow ball. During the reset operation, the powered tow ball will fully stow and then fully deploy.
Make sure the powered tow ball is fully deployed before connecting a trailer/caravan.
- Trailer lamp test button: Press to start a 3 minute sequence for a vehicle and trailer light test.
- For the test to operate, the vehicle's lights should be switched off, the Electric Parking Brake (EPB) should be engaged and the ignition should be switched off.
- The vehicle's lights and the trailer's lights will operate at the same time so that a visual check can be made of all the lights.
- The 3 minute sequence can be stopped at any time by any the following actions; pressing the trailer lamp test button again, by switching on the vehicle's lights or switching the ignition on.
READ NEXT:
 Trailer hitch (Australia only)
Never leave the trailer hitch loose
in the vehicle. It could become a
projectile in the event of an
accident, or during heavy braking.
Consult a Retailer/Authorised Repairer for
the latest informati
Essential towing checks
Do not exceed the Gross Vehicle
Weight (GVW), maximum rear
axle weight, maximum trailer
weight, or nose weight.
Exceeding any of these limits
could cause instability and a loss
of control.
Do not loo
Tow bar dimensions and mounting points
5 seat vehicles and 7 seat vehicles without a spare wheel
Note: Dimensions refer to towing
equipment officially released by the
vehicle manufacturer.
7 seat vehicles with a spare wheel
Not
SEE MORE:
Rear end Sheet Metal
Repairs Rear
Bumper Mounting
Upper (G1780738) / Removal
and Installation
REMOVAL
NOTE:
The rear bumper mounting upper is installed in conjunction with:
Rear bumper cover
Rear bumper
Rear lamp assembly
Rear lamp panel outer
Back panel outer
The rear bumper mounting upper is serviced as indicated.
Before commencing this procedure make sure that you are aware of
Diagnosis and Testing Information and Entertainment System/ Symptom chart
SYMPTOM:
Audio/video system
inoperative at start up
POSSIBLE CAUSES:
Last used audio/video
source inoperative
MOST network fault
ACTION
GO to Pinpoint Test A.
SYMPTOM:
Audio/video soft key
greyed out on touch
screen
POSSIBLE CAUSES:
Last used audio/video
source ino
