Land Rover Discovery: Door locks and release levers
While a door is open, the locking latch is exposed. If your vehicle is fitted with the 'soft close' feature, do not attempt to manually close the latch, as it may also automatically 'soft close' and trap items or body parts.
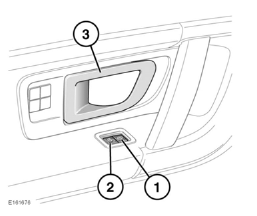
- Press to lock. With all of the doors closed, press a lock switch to lock all of the doors.
- Press to unlock: Press an unlock switch
to unlock all of the doors. Alternatively,
pull either front door release lever (3)
once to unlock all of the doors.
Pull either rear door release lever once, to unlock the individual rear door.
- Pull to unlock and open a door. If the door is locked, pull either front door release lever once to unlock all of the doors. Pull either rear door release levers once to unlock only the individual rear door.
Note: If the vehicle is locked with the Smart key, operating an interior door release lever unlocks only that door. If the door is opened, the alarm sounds.
Note: The rear door Child safety locks inhibit the rear door lock and unlock switches and the door release levers.
MISLOCK
When locking the vehicle with the Smart key, a mislock can occur if:
- One or more of the doors, the bonnet or the luggage area is not fully closed.
- The ignition is ON.
- A Smart key is left inside the vehicle.
If any of the above are present, the vehicle will NOT lock and there will be an audible mislock error warning. The hazard warning lamps will NOT flash and the door mirrors (if enabled) will NOT fold in. Check that all of the doors, the bonnet and the luggage area are closed properly. Make sure the ignition is switched OFF and lock the vehicle again. If the mislock persists, consult your Retailer/Authorised Repairer
DEACTIVATING THE ALARM WHEN TRIGGERED
If the alarm has been triggered, it can be deactivated by any one of the following methods:
- Pressing the unlock button on the Smart key.
- Opening a door using Keyless entry.
- Pressing the START/STOP button with a valid Smart key positioned correctly.
The cause of the last alarm activation can be displayed in the Message centre.
Emergency locking
In the event of the battery discharging, or a fault with the locking system, each of the doors must be locked manually.
The emergency key blade is required for this procedure.
Note: Do not leave the emergency key blade in the vehicle at any point during the emergency locking procedure.

- Open a door and locate the emergency lock access cover on the edge of the door. The cover has an embossed lock icon. Insert the emergency key blade into the cover slot, rotate the cover counter-clockwise to first release it, then pull to remove it from the door. Keep the lock access cover safe.
- Insert the emergency key blade firmly
into the emergency lock. A firm push
activates the door locking mechanism.
Remove the emergency key blade.
- Refit the emergency lock access cover and rotate it clockwise to secure it firmly.
- Close the door and check that it is locked.
Repeat the procedure for all other unlocked doors.
READ NEXT:
 Manual seats / Electric seats
Manual seats
Forward and rearward adjustment.
Height adjustment.
Seatback angle adjustment.
For information on how to adjust the front
head restraint
Do not adjust the seat while the
vehicle is
Sitting in the correct position
The driver and front seat
passenger must not ride with the
seat fully reclined.
Do not adjust the seat while the
vehicle is moving.
The seat, head restraint, seat belt and
airbags, all contribute to
SEE MORE:
Diesel exhaust fluid (DEF)
In order to comply with exhaust emissions
requirements, some vehicles with diesel
engines are fitted with a reservoir
containing Diesel Exhaust Fluid (DEF). In
some markets, DEF is known as AdBlue,
AUS 32 and ARLA 32.
Note: It is a legal requirement that the
DEF system is used correctly, as detailed
Driveshaft - Ingenium I4 2.0l Diesel, Vehicles with- active Driveline
(G1890848) - Removal
PART(S)
REMOVAL
WARNING:
Make sure to support the vehicle with axle stands.
Raise and support the vehicle.
Refer to: Exhaust System (309-00C Exhaust System - INGENIUM I4
2.0L Diesel, Removal and Installation).
Refer to: Diesel Particulate Filter - Vehicles With: Diesel Exhaust
Fluid (309-00C
