Land Rover Discovery: Gesture tailgate
Make sure there is sufficient space above and at the rear of the vehicle, before operating the tailgate.
Insufficient opening space may result in damage to the vehicle.
Do not operate the tailgate if a cycle rack is fitted to the tailgate.
Remove any cycles and/or racks before operating the tailgate.
Sensors, positioned within the outer parts of the rear bumper, recognise movement of a foot below the bumper level, and allow automatic opening or closing of a powered tailgate.
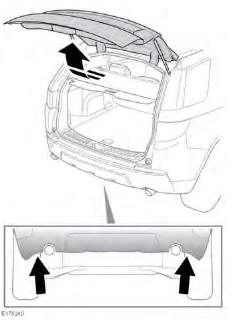
With the ignition off, approach the rear of the vehicle and perform a smooth upward kick movement, taking between one and two seconds, beneath one of the rear sensor areas. When a valid upward kick movement is recognised by the vehicle, the direction indicators flash and the tailgate operates. If an audible warning is given, the tailgate does not operate.
Make sure that the standing area is stable and not slippery, before performing the kick movement.
Do not make contact with the vehicle exhaust. It may be hot and cause injury.
Note: A valid Smart key must be within 1.2 m of the tailgate. The Smart key may not be detected if it is placed within a metal container, or if it is shielded by a device with a back-lit LCD screen, such as a smartphone, laptop (including when inside a laptop bag), games console, etc.
Keep the Smart key clear of such devices when attempting hands-free tailgate operation of the powered tailgate. Note: Certain conditions may affect the performance of the sensors, and movement beneath the bumper may not be detected. If this should happen, use the interior tailgate release switch or the Smart key tailgate release button. Check the operation of the Gesture tailgate when the vehicle is in a new location.
Unintentional opening: In exceptional circumstances, and if the Smart key is within 1.2 m of the tailgate, the powered tailgate may open unintentionally due to the following:
- Car washing / high pressure cleaning.
- Moving objects beneath the rear bumper sensors.
- While changing a rear road wheel.
TAILGATE OPENING HEIGHT
Set the maximum opening height as required:
- Open the tailgate to the position required as the maximum height. Press any tailgate control to stop movement at the required position. The final position can be achieved manually, if required.
- Make sure the tailgate is stationary for at least three seconds.
- Press and hold the tailgate close switch for 10 seconds to set the required opening height.
- Press a close switch to close the tailgate, then open again to check that it opens to the required height.
Note: If, after performing part 3 of the process, the tailgate closes automatically, the required height has not been set.
Repeat the process, making sure that all steps are adhered to.
To reset the maximum opening height, repeat the process, but when the tailgate reaches its current programmed height, manually move it to the fully open position, before pressing and holding the button.
The tailgate may lose its position memory if there are multiple object detections, or if the battery voltage is low. Powered operation may be inhibited.
To reset the tailgate:
- Manually close the tailgate.
- Press a release switch.
- Allow the tailgate to power fully open, or to the previously set position.
- Press and release the close switch.
- Allow the tailgate to power close fully.
The tailgate's programmed memory is now be restored.
READ NEXT:
 Smart key battery replacement
When the battery needs replacing, there
is a significant decrease in the effective
range and SMART KEY BATTERY LOW
is displayed in the Message centre.
To replace the battery:
Remove the cover by s
Single locking
Before exiting the vehicle, always
make sure that the correct gear
for parking is selected, the engine
is switched off, the Electric
Parking Brake (EPB) is applied,
and the Smart key is removed
from t
SEE MORE:
Headlamp Leveling
PRINCIPLES OF OPERATION
For a detailed description of the Headlamp Leveling system, refer to the
relevant Description and Operation section in the workshop manual. REFER
to: Exterior Lighting (417-01 Exterior Lighting, Description and Operation).
INSPECTION AND VERIFICATION
CAUTION:
Diagnosis by sub
Front Suspension Front
Shock Absorber (G1779642) - Removal
GENERAL EQUIPMENT
PART(S)
REMOVAL
WARNINGS:
Make sure the spring compressor Safe Working Load (SWL) meets
or exceeds the spring rating quoted in the Specifcations section.
Always follow the spring compressor manufacturer's
instructions.
The spring is under extreme tension, care must be tak
