Land Rover Discovery: Head up display
The Head-Up Display (HUD) feature projects driver information onto the inside of the windscreen.
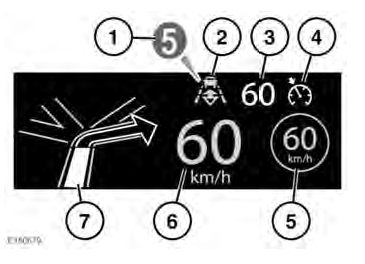
The information displayed is as follows:
- Current gear selected.
- Follow mode is active.
- Cruise control set speed.
- Cruise control or Adaptive Cruise Control (ACC) is active.
- Traffic sign recognition, identified speed limit.
- Current vehicle speed.
- Turn-by-turn navigation instructions.
The HUD can be controlled from the Head-Up Display (HUD) option in the Instrument panel menu.
Once selected, the menu offers a number of options, including:
- Switching the HUD on/off.
- Selecting which information is displayed on the inside of the windscreen.
- The position of the display.
- The brightness of the display.
It is important that the position of the display is set correctly. The correct position is dependent on a number of conditions, including the height of the driver and the seat position.
Note: Before setting the position of the HUD, make sure that the driver's seat is correctly positioned. The HUD level should be set horizontally, within the driver's vision.
To set the display position, select Position from the Head-Up Display (HUD) menu and follow the on-screen instructions. Use the driver's seat memory store button (M) to store your preferences.
The brightness of the display is set automatically to suit the ambient light conditions. Brightness can be manually adjusted to your preferred level by selecting Brightness from the Head-Up Display (HUD) menu. Follow the on-screen instructions and then press OK to confirm.
The HUD is linked to the Trip computer units settings. If fuel economy is set to mpg, the HUD will be in miles. If fuel economy is set to km/l, the HUD will be in kilometres
Note: In extreme temperatures, the HUD takes a longer time to display from start-up. This is to make sure that the HUD always runs at its optimum temperature.
Note: It may not be possible to see the full HUD image, while wearing polarised sunglasses.
Note: Do not place anything over the HUD unit, which is positioned above the Instrument panel, next to the windscreen.
If cleaning is required
READ NEXT:
 Warning lamps and indicators
Do not ignore warning lamps or
indicators. Take appropriate
action as soon as possible. Failure
to do so may result in death or
serious injury, or serious damage
to the vehicle.
RED warning lamps are
General warning/ information message (amber)
Illuminates when a non-critical
warning message or an
information message is available
in the Message centre.
GLOW PLUGS (AMBER)
Illuminates when the ignition is
switched on, to indicate that the
glow
SEE MORE:
Examples of Damage to Seat Cover
Below are some examples of damage that would not be accepted under the
terms of the Jaguar Land Rover warranty agreement. Please note: these are
examples only and do not represent all warrantable/non warrantable
customer concerns.
The examples below show damage such as cuts, tears and puncture hole
All Wheel Drive
Control Module (AWDCM) /
Description
The AWDCM is located at the front right side of the RDU, adjacent to the
drive flange. The AWDCM is attached to the RDU casing and secured with
screws.
Two electrical connectors provide the interface between the AWD valve
block and the vehicle systems. The upper connector provides the
connections
