Land Rover Discovery: Description - All Markets Except
Description - all markets except for Japan/ Asia
NOTE:
The Japan/India/Chian/Asia satellite navigation system does not store map data on the Integrated Audio Module (IAM). All other functions of the IAM are applicable to these markets. Refer to the following sections 'Description - Japan' or 'Description - India/Chian/Asia' for details of the specific market navigation system.
INTEGRATED AUDIO MODULE (IAM) - INCONTROL TOUCH PLUS AND INCONTROL TOUCH PLUS WITH MERIDIAN SURROUND AUDIO SYSTEMS
The IAM is connected on the Media Oriented System Transport (MOST) ring to the other audio system components. The driver can control navigation functions by using the Touch Screen (TS), left steering wheel switchpack or by voice commands.
A 40 GB hard drive is used for storing the information for satellite navigation and music files. A 10GB partition is provided for storing music files, the remaining 30GB is used for map data storage.
The integral hard drive for the navigation system removes the requirement of a separate Navigation Control Module (NCM). The IAM stores the navigation map data locally within the 30GB hard drive partition. By storing the information in this way and processing it within the IAM, navigation display, route calculation speeds and accuracy are improved. Map upgrades and software are loaded directly into the IAM from a USB memory device.
The map images are transmitted from the IAM to the Touch Screen (TS) via a Low Voltage Differential Signal (LVDS) link cable. Turn by turn instructions are also available, these are displayed in the windshield by the Head Up Display (HUD) Control Module or in the Instrument Cluster (IC) via a medium speed Controller Area Network (CAN) connection between the HUD control module or IC and the TS.
The IAM communicates on the MOST ring with the rest of the audio system.
If the IAM is replaced it must be configured as a new module using an approved Land Rover diagnostic system.
Calibration of the IAM using an approved Land Rover diagnostic system enables updates to be downloaded as new technology becomes available or any fault concerns require software updates.
For further details on IAM functionality refer to the Audio system.
For additional information, refer to: Audio System (415-01, Description and Operation).
AUDIO HEAD UNIT (AHU) - INCONTROL TOUCH AUDIO SYSTEMS
The AHU is connected to other vehicle systems via the medium speed Controller Area Network (CAN) comfort systems bus and via an APIX2 connection to the Touch Screen (TS). The driver can control navigation system functions by using the TS, the left steering wheel switchpack or by Voice commands.
Navigation data is stored on an Secure Digital (SD) memory card which is inserted in a socket in the portable audio interface panel in the floor console. The AHU reads the map data directly from the SD memory card.
For further details on IAM functionality refer to the Audio system.
For additional information, refer to: Audio System (415-01, Description and Operation).
ROOF POD
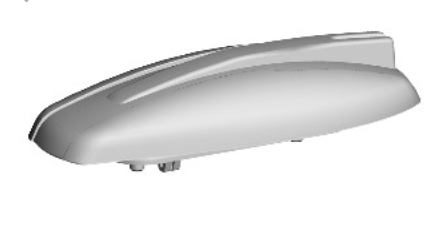
The navigation GPS antenna is located in the roof pod. Depending on vehicle specification the roof pod can contain a GPS, digital radio, Global System for Mobile communications (GSM) or satellite radio antennas.
The roof pod is fitted externally on the roof panel and is attached to the roof panel with two flanged nuts which screw onto captive studs in the roof pod. Two co-axial connectors provide for the connection for the GPS antenna and the satellite or digital radio antenna.
On vehicles with the Telematics system, the GPS/GSM signal is passed via a co-axial cable to the GPS signal splitter where it is then passed to the IAM, AHU or NCM (dependent on vehicle specification) for use by the navigation system and to the Telematics Control Module for use by the telematics system.
TRAFFIC MESSAGE CHANNEL (TMC) ANTENNA
Data messages for TMC are received through the FM antenna located in the rear window and the FM/TMC/DAB-III antenna amplifier located in the tailgate. The antenna is also used by the IAM/AHU for reception of FM2 and Digital Radio transmissions.
For additional information, refer to: Antenna (415-01, Description and Operation).
VOICE CONTROL SYSTEM
NOTE:
Voice control of the navigation system is not available in Japan or Asia markets.
The voice control system provides the driver with the option of voice control for a range of supported functions. The following systems include Voice functionality:
- Radio, satellite radio and Digital Radio (if fitted)
- CD player (IAM only)
- Hard disk drive/virtual CD player (IAM only)
- USB and auxiliary connections
- Navigation system
- Bluetooth Telephone system
- Vehicle notepad (IAM only).
For additional information, refer to: Voice Control (415-01, Description and Operation).
DESCRIPTION - JAPAN
The Japan satellite navigation system uses a separate Navigation Computer Module (NCM) with map data supported by an DVD disk. Additional components are: a NCM and a Navigation Interface Module (NIM.
NAVIGATION COMPUTER MODULE (NCM)
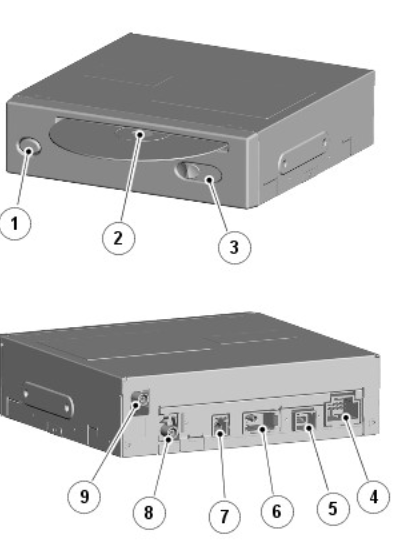
- DVD eject button
- DVD loading slot
- DVD eject lock
- Power and ground connections
- GVIF video output connector to video interface module
- MOST connector
- VICS beacon antenna connector
- GPS antenna connector
- VICS FM antenna connector
The NCM is located in the left rear of the luggage compartment, The module is located on a bracket below the front right seat.
The NCM is a DVD drive which reads map data direct from a DVD. The NCM is connected on the MOST ring and communicates with the Touch Screen (TS) to initiate navigation video and audio output. The GPS antenna is connected directly to the NCM.
The NCM outputs the video signals in a Gigabyte Video InterFace (GVIF) format to a Navigation Interface Module (NIM) which converts the GVIF input to a Low-Voltage Differential Signalling (LVDS) video signal output which is then passed to the TS. Audio output is on the MOST ring to the audio amplifier module.
VICS FM transmission signals are received by the NCM via a FM antenna in the rear window and a FM / TMC / DAB-III antenna amplifier. Infrared and RF microwave VICS transmissions are also received by the VICS beacon antenna, located on the top of the instrument panel, and are passed to the NCM.
NAVIGATION INTERFACE MODULE (NIM)
- Power, ground and 5V signal voltage from TS connector
- LVDS video output to TS connector
- GVIF video input from NCM connector
The NIM is located below the front right seat. The NIM is required to convert the GVIF video output to LVDS video signal which is compatible with the TS.
A 5V signal output from the TS is connected to the NIM. The signal voltage initiates a power up of the NIM when the TS is active.
Vehicle Information and Communication System (VICS)
The VICS is a similar system to the TMC used outside of Japan. VICS is a unique system to Japan and provides countrywide coverage and broadcasts of real-time traffic and weather information.
The VICS has three methods of transmitting the traffic data to the vehicle's navigation system: FM, microwave RF and infrared.
The microwave and infrared transmissions are both received by the VICS beacon antenna located on the instrument panel.
The same information is also transmitted on a FM wavelength and is received by the FM antenna located in the rear window and uses the audio system FM / TMC / DAB-III antenna amplifier to pass the signals to the NCM.
DESCRIPTION - INDIA , CHINA , ASIA
.jpg)
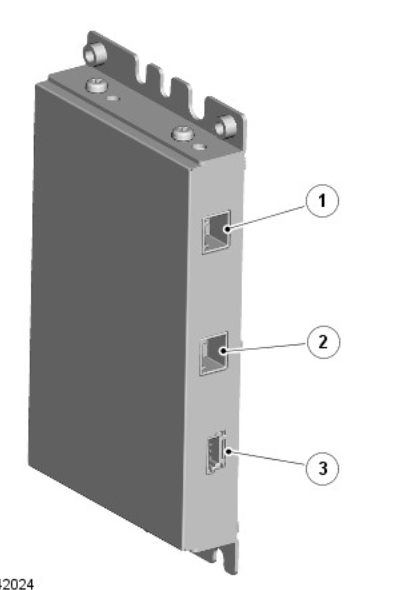
- NCM - China market
- NCM - India market
- SD memory card socket
- Power, CAN and audio connector
- LVDS video output to TS
- GPS antenna connector
In China and India markets a unique NCM is fitted. The medium speed CAN based NCM is located below the front right seat. These systems are only fitted to vehicles with an Integrated Audio Module (IAM).
NOTE:
In some markets the NCM is fitted by the dealer before delivery to the customer.
The NCM outputs the video signals in a LVDS format direct to the TS. Audio output is passed to the IAM which converts the signals and passes them to the Audio Amplifier Module (AAM) on the MOST ring. When Audio is required, such as a Voice guidance instruction, the NCM communicates to the vehicle audio system using a hard wire connection between the TS and the NCM. Touch screen co-ordinates and vehicle power mode status is obtained through the medium speed Controller Area Network (CAN) comfort systems bus. Map data is stored via a Secure Digital (SD) memory card accessible through an access point on the NCM.
A 5V signal output from the TS is connected to the NCM. The signal voltage initiates a power up of the NCM when the TS is active.
READ NEXT:
 Navigation System / Operation
The navigation system receives GPS information via the GPS
antenna. The
GPS signals are used by the navigation system to calculate the vehicle's
position. Once the driver has input a desired destinat
Navigation System/ Control diagram
CONTROL DIAGRAM - AUDIO HEAD UNIT ( AHU ) INCONTROL TOUCH
AUDIO SYSTEMS
NOTE:
A = Hardwired; I = CVBS; AP = Medium speed CAN Comfort
systems; AU = APIX2
Audio Head Unit (AHU)
Head-Up Display (HU
Navigation System Module (G1785187) / Removal and Installation
REMOVAL
NOTE:
Removal steps in this procedure may contain installation details.
Disconnect the battery ground cable.
Refer to: Specifications (414-01 Battery, Mounting and Cables,
Specifications).
Re
SEE MORE:
Fuel Charging and Controls
- Ingenium i4 2.0l Diesel
/ Diagnosis and Testing
PRINCIPLES OF OPERATION
For a detailed description of the Fuel Charging and Controls system, refer
to the relevant Description and Operation section in the workshop manual.
REFER to: Fuel Charging and Controls (303-04C Fuel Charging and Controls
- INGENIUM I4 2.0L Diesel, Description and Operation)
Telephone system overview
For information on connecting a
Bluetooth phone or device.
Note: Some Telephone system features
will not operate unless the SD card
supplied with the vehicle is inserted
correctly into the SD card slot.
Change device: Touch to search for a
new, or change to another paired
phone or device.
Mes
