Land Rover Discovery: Rear Drive Unit (RDU)
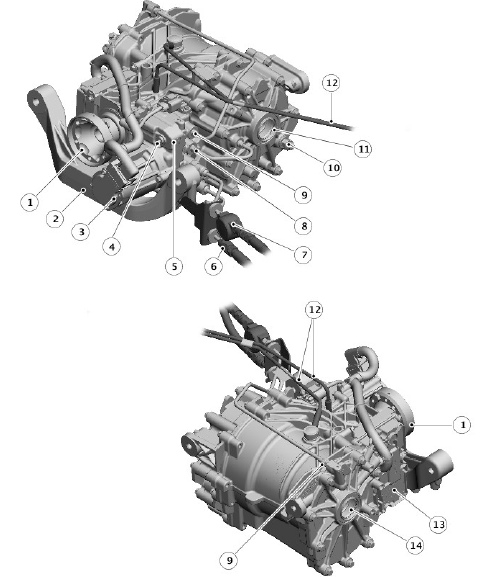
- Drive flange
- Mounting bracket
- RDU pump
- All Wheel Drive (AWD) valve block oil filler plug
- AWD Valve block
- PTU synchroniser piston pressure line P4
- PTU synchroniser piston pressure line P3 including pressure damper
- Left RDU clutch pressure line P2
- Right RDU clutch pressure line P1
- RDU oil level plug
- Left inner disc carrier
- Breathers
- AWD Control Module (AWDCM)
- Right inner disc carrier
Rear Drive Unit (RDU) Sectional View
.jpg)
- AWD valve block
- RDU pump
- Pre-load nut
- Drive flange
- Oil seal
- Mounting bracket
- AWD Control Module (AWDCM)
- Taper roller bearing
- Pinion shaft and drive gear
- Collapsible spacer
- Right clutch pressure connection P1
- Ball bearing
- Right inner disc carrier
- Oil seal
- Right cover
- Clutch pack
- Outer disc carrier
- Casing
- Crown wheel shaft and drive gear
- Intermediate housing
- Left outer disc carrier
- Left cover
- Left inner disc carrier
- Left clutch pressure connection P2
- Hydraulic fluid reservoir
The RDU comprises a main casing, an intermediate casing and left and right covers. Within the casing is a crown wheel drive gear and shaft, a pinion drive gear and shaft, two wet, multiplate clutch packs and two hydraulically actuated pistons.
Externally mounted on the casing is an AWD valve block which contains four solenoid operated pressure control valves and an electrically operated hydraulic pump. The All Wheel Drive Control Module (AWDCM) is located externally on the casing.
The casing is filled with oil for lubrication of the pinion and crown wheel drive gears and bearing and also lubrication and cooling for the multiplate clutch packs. A fill/level plug is located on the left cover and a drain plug is fitted to the underside of the casing.
The intermediate casing allows for the internal components to be assembled within the main casing and also houses the left multiplate clutch pack assembly.
The crown wheel drive gear is mounted longitudinally across the RDU on a crown wheel shaft. The drive gear is a low-offset hypoid bevel gear configured for minimal power loss across the speed range. Both ends of the crown wheel shaft have splines which mate with corresponding splines in the outer disc carrier of the multiplate clutch pack.
The crown wheel shaft is supported on opposing taper roller bearings which are pressed into the casing and the intermediate casing.
The pinion drive gear and shaft is locked in the casing at 90 degrees to the crown wheel drive gear. The pinion drive gear shaft is supported in the housing on opposing taper roller bearings. The pinion drive gear shaft is retained in the casing with a pre-load nut. The outer end of the pinion gear is splined and mates with the drive flange. The drive flange is secured on the pinion gear by the pre-load nut.
A collapsible spacer is located between the taper roller bearings. The collapsible spacer holds the taper roller bearings in alignment and also collapses under pressure applied by the pre-load nut. This allows the preload nut to be tightened to a predetermined torque, which collapses the spacer, setting the correct taper roller bearing pre-load and therefore the correct meshing of the teeth of the pinion drive gear and the crown wheel drive gear.
RDU Clutch
RDU Clutch Exploded View
.jpg)
NOTE: Left clutch assembly shown, right clutch assembly similar
- Taper roller bearing
- Roller bearing
- Outer disc carrier
- Inner disc carrier
- Inlay
- Outer friction disc
- Inner plain disc
- Pressure disc
- Roller bearing
- Circlip
- Ball bearing
- Circlip
- Spring washer
- Ring
- Shim
- Piston
- Left cover
The clutch assemblies comprise an outer disc carrier which locates on splines on the crown wheel drive shaft, an inner disc carrier which is located in a ball bearing in the left cover, six inner plain metal discs, six outer friction discs and a piston which is located in the left cover.
The outer disc carrier has a splined bore which locates on the crown wheel drive shaft. Machined teeth on the inside face of the carrier provide positive location for the outer friction discs.
The inner disc carrier is located inside the outer disc carrier and supported on a ball bearing in the left or right cover. External machined teeth provide positive location for the inner plain discs. An internal bore in the inner disc carrier is splined to accept the halfshaft.
A piston with two seals is fitted to a machined bore in the left or right cover.
The piston receives hydraulic pressure from the RDU pump via the AWD valve block and applies pressure to lock the inner and outer clutch discs together. A needle roller bearing is located between the piston and the pressure disc which allows the piston to remain stationary as the clutch discs and carriers rotate.
The outer disc carrier is permanently driven, when the PTU synchroniser is engaged, via the splines on the crown wheel shaft. When pressure is applied to the piston, it presses the inner and outer discs to together, locking the inner and outer carriers together and allowing drive from the crown wheel shaft to be passed to the halfshaft via the inner disc carrier.
All Wheel Drive (AWD) Valve Block
AWD Valve Block
- Electrical connector
- RDU pump and actuator
- AWD valve block
AWD Valve Block Components
.jpg)
- Solenoid P4
- Solenoid P3
- Solenoid P2
- Solenoid P1
- Electrical contact element
- Valve body
- Oil filler plug
- Pressure adaptor
- RDU pump
- Pump housing
- Seal
- Electric actuator
- Electrical connector
- Suction filter
- Spool sleeve (4 off)
- Spool (4 off)
The AWD valve block is located at the front left side of the RDU, adjacent to the drive flange. The valve block is sealed to the RDU casing and secured with screws.
The body of the valve block and the casting voids in the casing form the hydraulic fluid reservoir. A sealed plug is located at the top of the valve block body for hydraulic fluid filling. A second sealed plug is located at the base of the valve body for hydraulic fluid draining.
Four machined bores house the spool sleeves and spool valves for the operation of Pressure Control valves (PCV) P1, P2, P3 and P4.
The PCV's control the following functions:
- P1 - Right RDU clutch
- P2 - Left RDU clutch
- P3 - PTU synchroniser piston - engage synchroniser
- P4 - PTU synchroniser - disengage synchroniser
Control Solenoid and Spool Valve
.jpg)
- Control solenoid
- Spool
- Spring
- Spool sleeve
- Sleeve spring
Four variable force control solenoids are secured in the valve block with screws. The solenoids are PWM (pulse width modulation) controlled by the AWDCM and provide measured operation of the spool valves to supply the required hydraulic pressure for RDU clutch and PTU synchroniser operation.
The spool valves comprise a spool sleeve and spool valve. The spool valve is operated by the control solenoid which moves the spool within the sleeve.
Movement of the spool opens and closes ports on the sleeve supplying pressure to the applicable function.
A electrical contact element with an electrical connector is located on the top of the valve block. The electrical connector has a contact element which connects with each of the four solenoids in the valve body. The contact element is secured in the valve body with two screws and sealed with an O ring seal.
Service Pressure Lock Pins
.jpg)
- PCV port P4
- PCV port P3
- Pressure lock pins
Spool valves P3 and P4 are fitted with an anti-spill valve device that can be operated externally via the pressure lock pins. The anti-spill valves block the ports and enable the hydraulic pipes and RDU to be removed or serviced, without loss of hydraulic fluid from the reservoir. To open the anti-spill valves once servicing is complete, the bleeding procedure must be run. Pressure is applied to both P3 and P4 ports forcing the spill valves to open. This can be verified by checking that the pins are now in the fully extended position.
During normal operation, the pins should be visible, protruding from the valve block body.
The RDU pump is located in the pump housing and secured with two screws. The pump drive shaft engages on the electric actuator output shaft.
The pump housing is attached to the valve body, secured with three screws and sealed with an O ring seal. The pump output port connects with a pressure adaptor within the valve body. Pressure from the pump flows through the pressure adaptor and into drillings in the valve body to supply each of the four spool valves.
RDU Pump and Actuator
RDU Pump
.jpg)
- Oil seal
- Screw (2 off)
- Seal
- Pump body
- RDU pump
- Electrical actuator
- Compensation seal
- Compensation plate
- Driving gear input shaft
- Driving gear and driven gear
- Compensation plate
- Compensation seal
- Seal
- Nut (2 off)
- Pump cover
- Dowel (2 off)
The RDU pump is located in the pump housing and is secured with two screws. The pump is a rotary gear pump with a flow of 1 cm³ (0.061 in³) per revolution and maximum output pressure of 42 bar (609 lbf/in²).
The pump fluid inlet port is fitted with a suction filter which is located at the bottom of the fluid reservoir within the valve block.
A pressure adaptor connects the pump outlet port to drillings in the valve body.
The driving gear input shaft is engaged with the output shaft of the electrical actuator, which directly drives the driving gear.
As the driving and driven gears rotate they separate on the inlet side of the pump. This creates a void and a depression which is filled by the hydraulic fluid. The hydraulic fluid is carried by the gears to the outlet side of the pump, where the meshing of the gears displaces the fluid. The mechanical clearances of the gears and the pump body are small allowing for the generation of high output pressure.
The electric actuator is a brushless DC (direct current) motor. The actuator has a fixed stator and a rotating permanent magnet rotor. The actuator has a maximum rotational speed of 5000 Revolutions Per Minute (RPM) and a maximum torque output of 0.9 Nm. Maximum current consumption is 30 Amperes.
The AWDCM provides an AC (alternating current)PWM output to operate the actuator in the correct direction and speed. The output is dependent on inputs received by the AWDCM from other system modules.
Three Hall sensors within the motor provide position and rotation speed feedback signals to the AWDCM.
READ NEXT:
 All Wheel Drive Control Module (AWDCM)
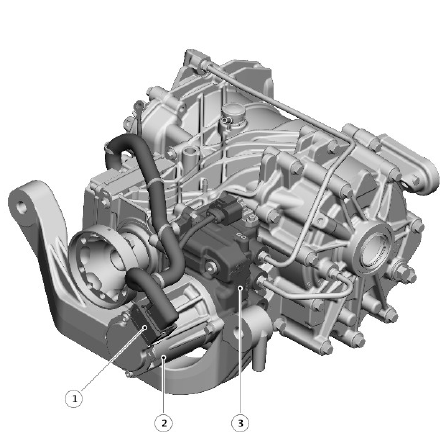
The AWDCM is located at the front right side of the RDU, adjacent to the
drive flange. The AWDCM is attached to the RDU casing and secured with
screws.
Two electrical connectors provide the interfac
Four-wheel Drive Systems - Vehicles With- Active Driveline - Operation
OPERATION
POWER TRANSFER UNIT (PTU)
The Active Driveline Power Transfer Unit (PTU) input shaft is driven directly
from the transmission differential. When the hydraulically operated triple
cone synchr
Four-wheel Drive Systems - Vehicles Without- Active Driveline/ Description
and Operation
COMPONENT LOCATION - ALL WHEEL DRIVE SYSTEM - VEHICLE SWITH OUT ACTIVE
DRIVELINE
Power Transfer Unit (PTU)
Driveshaft
Active On-Demand coupling
Rear differential
POWER TRANSFER UNIT (PTU) - V
SEE MORE:
Component location - Incontrol touch/ Incontrol plus
COMPONENT LOCATION - INCONTROL TOUCH - 6 SPEAKER AUDIO SYSTEM
Front right bass speaker
Front right tweeter speaker
Rear right bass speaker
Roof pod
Antenna amplifier FM/DAB-III
Radio Frequency (RF) filter - High Mounted Stop Lamp (HMSL)
Antenna amplifier AM/FM
RF Filter - rear wiper motor
Sectioned View of Typical
Fuel Fired
Booster Heater
Combustion air fan
Coolant inlet
Coolant outlet
Burner insert
Heat exchanger
Overheat temperature sensor
Exhaust
Fuel inlet
Evaporator
Air inlet
COMBUSTION AIR FAN
The combustion air fan regulates the flow of air into the FFBH to support
combustion of the fuel supplied by the FFBH fuel
