
Land Rover Discovery: Rear towing eye
- The towing eye at the rear of the vehicle is designed for on-road recovery only. If they are used for any other purpose, it may result in vehicle damage and serious injury.
- Use extreme caution when
moving or towing the vehicle.
Death or serious injury may occur.
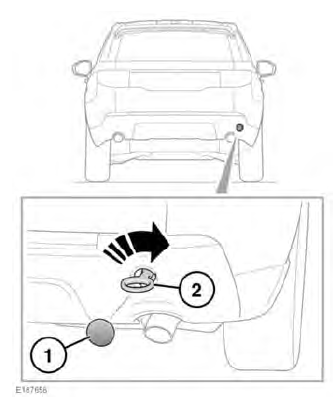
The towing eye must be screwed into the towing point, located behind the panel on the right-side of the rear bumper. The towing eye is located under the loadspace floor cover.
-
Pop out the access cover.
-
Locate the towing eye through the bumper, and fully screw the towing eye clockwise into the towing point until secure.
Fitment of the panels is the reverse of removal.
Use extreme caution when detaching towing equipment.
Vehicle movement is possible which can result in serious injury.
TRANSMISSION PARK RELEASE
Make sure that the vehicle is secured with wheel chocks, apply the Electric Parking Brake (EPB), or firmly press the brake pedal (this will require 2 people). Failure to do so can result in unexpected movement of the vehicle, causing serious injury or death.
When recovering the vehicle, it is essential that the Transmission park release mechanism is activated. This will lock the transmission in Neutral (N) and prevent the transmission from automatically selecting Park (P).
The recovery agent must activate the Transmission park release before recovery commences. This procedure is covered in a separate publication for service personnel.
Failure to activate the Transmission park release can result in serious transmission damage.
When vehicle transportation has been completed, the Transmission park release mechanism will need to be deactivated.
To deactivate the Transmission park release mechanism, reverse the steps above.
OFF-ROAD RECOVERY
If the towing eyes are to be used for off-road recovery, it is essential that off-road driver training, covering recovery techniques, is undertaken.
READ NEXT:
 Before starting or driving
If the vehicle is involved in a
collision, it should be checked by
a Retailer/Authorised repairer, or
suitably qualified personnel,
before starting or driving.
Note: The vehicle has an SOS Emergency
c
Event data recording
This vehicle is equipped with an Event
Data Recorder (EDR). The main purpose
of an EDR is to record, in certain crash or
near crash-like situations, such as an airbag
deployment or hitting a road obst
SEE MORE:
Vehicle Specific Information and
Tolerance Checks
Hood Alignment
CHECK
Check the gap and profiles of the hood are correct.
ADJUSTMENT
NOTE:
Carry out this step for both sides.
Align the hood gap and profile to the front fender as illustrated.
Align the hood gap and profile to the front door as illustrated.
Torque: 25 Nm
Align the hood gap and profile to
Rear Drive Axle - Differential - Vehicles with- Active Driveline Differential
Rear Bushing (G1781300) / Removal and Installation
SPECIAL TOOL(S)
REMOVAL
WARNING:
Make sure to support the vehicle with axle stands.
Raise and support the vehicle
Remove the rear differential.
Refer to: Differential Case (205-02 Rear Drive Axle/Differential -
Vehicles With: Active Driveline, Removal and Installation).
Take note of the fit
