Land Rover Discovery: Headlamp removal
Land Rover Discovery (2009–2016) Owner's Manual / Maintenance / Headlamp removal
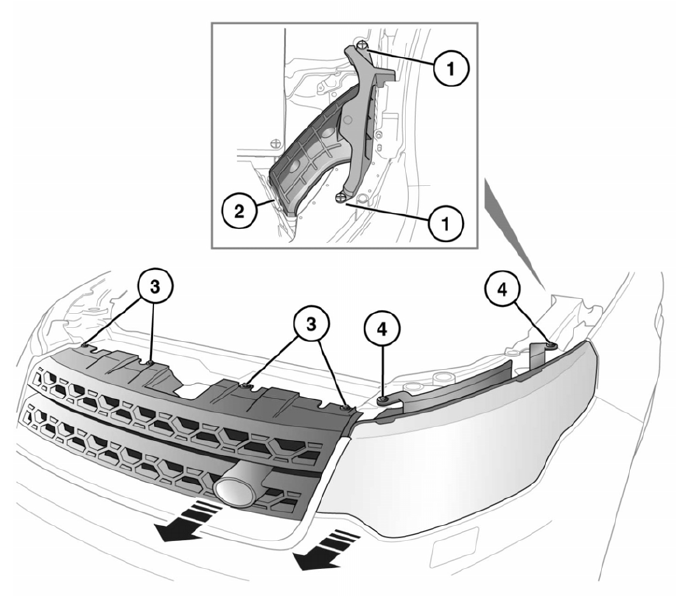
Moving the left headlamp unit to access the bulbs:
- Remove the 2 plastic fixings.
- Pull the tube up, to release it from the air box. This will allow more room for manoeuvrability.
- Remove the 4 grille fixings.
- Remove the 2 retaining bolts.
The headlamp unit can be withdrawn by 45 mm.
.gif)
Moving the right headlamp unit to access the bulbs:
- Remove the 4 grille fixings.
- Remove the 2 retaining bolts.
The headlamp unit can be withdrawn by 45 mm.
READ NEXT:
 Headlamp bulb replacement
At the back of the headlamp unit,
rotate the appropriate bulb cover
counter-clockwise and then lightly pull
to remove it.
Remove the low beam bulb holder
from the headlamp.
Unclip the low be
Rear direction indicator and reversing lamp bulb replacement
Replacing a rear direction indicator:
Remove the appropriate loadspace
vent door.
Rotate the rear lamp's retaining screw
counter-clockwise, until fully released
and then remove. This allows th
Wipers service position
To avoid damage to the bonnet, do
not lift the wiper blades when they
are in the normal parked position.
Note: The Smart key must remain in the
vehicle while the wiper blades are
replaced.
Before chan
SEE MORE:
Rear Center Safety
Belt Buckle (G1780795)
/ Removal and Installation
REMOVAL
NOTES:
Some variation in the illustrations may occur, but the essential
information is always correct.
Removal steps in this procedure may contain installation details.
Refer to: Specifications (414-01, Specifications).
NOTE:
RH illustration shown, LH is similar.
Torque: 40 Nm
Tyre repair kit safety information
Some tyre damage may only be
partially sealed, or may not seal
at all, depending on the amount
and type of damage. Any loss of
tyre pressure can seriously affect
vehicle safety.
Do not use the tyre repair kit if
the tyre has been damaged by
driving while under-inflated.
Tyre tread are
© 2019-2026 Copyright www.lrdisc.com
