Land Rover Discovery: Rain Sensor (G1780360) / Removal and installation
Land Rover Discovery (2009–2016) Service Manual / Body / Wipers and washers / Rain Sensor (G1780360) / Removal and installation
REMOVAL
NOTES:
- Removal steps in this procedure may contain installation details.
- Make sure the ignition is OFF at all times during the replacement procedure.
Refer to: Interior Rear View Mirror (501-09 Rear View Mirrors, Removal and Installation).

INSTALLATION
NOTES:
- Make sure the rain/light sensor windshield area is clear and clean of any contamination inside and out.
- Prior to switch the ignition ON first time after the rain/light sensor replacement please allow at least 10 minutes for the gel pad to adhere to the windshield surface.
- If the original rain/light sensor is to be reinstalled, configure and calibrate using Land Rover approved diagnostic equipment.
To install, reverse the removal procedure.
Rear window wiper motor (G1780359) removal and installation
REMOVAL
NOTE:
Removal steps in this procedure may contain installation details.
Refer to: Liftgate Trim Panel (501-05, Removal and Installation).
NOTE:
Make sure that this component is installed to the noted removal position.
Torque: 5.4 Nm
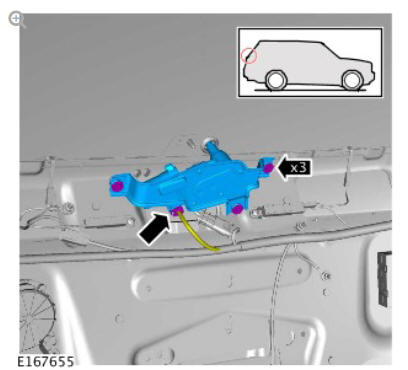
Torque: 5.4 Nm
INSTALLATION
To install, reverse the removal procedure.
READ NEXT:
 Rear Window Wiper Pivot Arm (G1780367) / Removal and Installation
REMOVAL
NOTE:
Removal steps in this procedure may contain installation details.
NOTE:
Make sure that this component is installed to the noted
removal position.
Torque: 5.4 Nm
NOTE:
Do not disassem
Windshield Washer Reservoir (G1780365) / Removal and Installation
REMOVAL
WARNING:
Make sure to support the vehicle with axle stands.
Raise and support the vehicle.
Refer to: Front Bumper Cover (501-19, Removal and Installation).
Torque: 5 Nm
Torque: 4.1 Nm
To
Wiper Pivot Arm (G1780362) / Removal and Installation
REMOVAL
NOTES:
Removal steps in this procedure may contain installation details.
LHD illustration shown, RHD is similar.
CAUTION:
Note the installed position of the component prior to
removal.
SEE MORE:
Power Steering - Overview
COMPONENT LOCATION
Steering gear
Steering column intermediate shaft
Heat shield
Overview
The vehicle is fitted with electric power steering, provided by a ZF
Servolectric steering gear unit with variable ratio, rack and pinion steering
and speed sensitive power assistance. Power assistance is
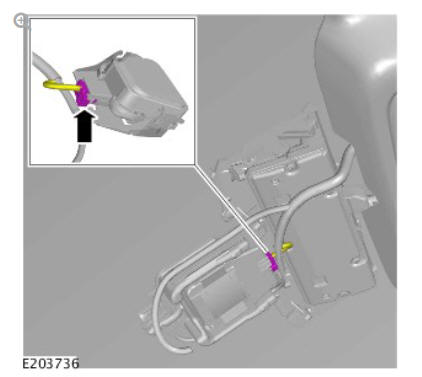
Telematics Control Module (G1785146) / Removal and Installation
REMOVAL
CAUTION:
Prior to any work being undertaken on the telematics
control module,
confirmation is required if there is a stolen vehicle tracking
subscription on the telematics control module. If there is stolen
vehicle tracking subscription, the telematics control module will need
to be placed
© 2019-2026 Copyright www.lrdisc.com
