Land Rover Discovery: Side Panel Sheet Metal Repairs / Description and Operation
Land Rover Discovery (2009–2016) Service Manual / Body / Body Repairs and General
Information / Side Panel Sheet
Metal Repairs
/ Description and Operation
GALVANIC CORROSION
For additional information, refer to: Corrosion Protection (501-25B, Description and Operation).
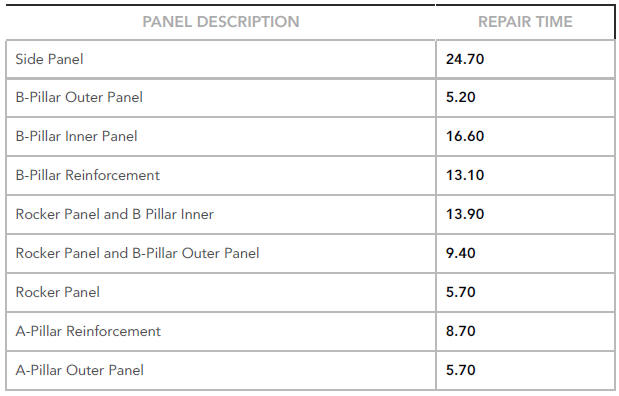
BODY SIDE SERVICE PANELS
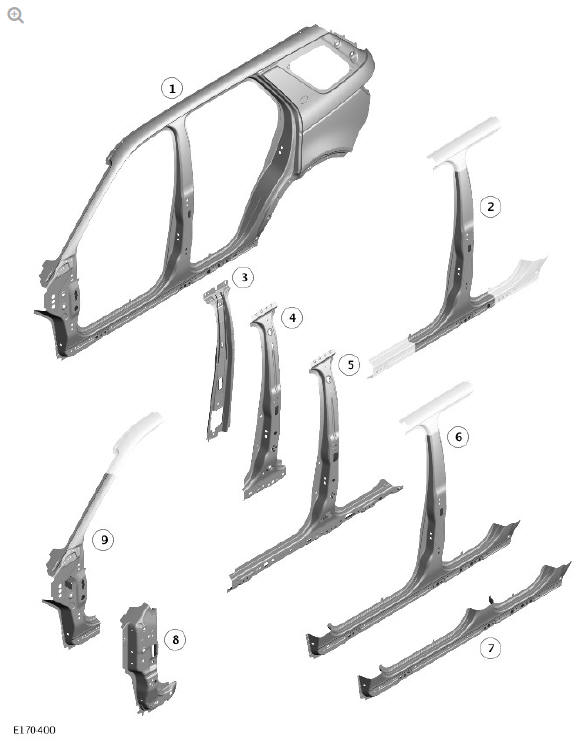
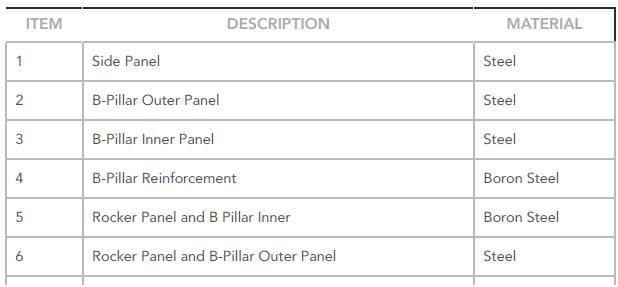

TIME SCHEDULES , BODY SIDE SERVICE PANELS
The following information shows the total time taken to install single panels.
These times do not include removal of mechanical, electrical and trim, (MET), items or paint times.
The times shown are to be used as a guide only.
READ NEXT:
 Side Panel Sheet
Metal Repairs
Side Panel (G1770901)
- Removal
Side Panel Sheet
Metal Repairs
Side Panel (G1770901)
- Removal
REMOVAL
NOTE:
The side panel is installed in conjunction with:
Front bumper cover
Fender
Fender splash shield
Front fender mounting panel
Windshield
Front door
Rear door
Rocker panel moulding
Side Panel Sheet
Metal Repairs
Side Panel (G1770901)
- Installation
Installation
NOTE:
Make sure that a zinc rich primer is applied to any bare metal
surfaces.
Dress the flanges where necessary
Clean and prepare the panel surfaces.
CAUTION:
This step requires the
SEE MORE:
Interior Lighting / Description and Operation
COMPONENT LOCATION - SHEET 1 OF 2
Central Junction Box (CJB)
Instrument panel illumination
Approach lamp - door mirror
Door ambience lighting Light Emitting Diodes (LEDs)
Luggage compartment ambience lighting LEDs
Luggage compartment lamp
Tailgate latch - ajar switch
Rear interior lamps
Anti-Theft - Active Anti-Theft Alarm Horn with Integral Battery (G1791765)
/ Removal and Installation
SPECIAL TOOL(S)
REMOVAL
NOTE:
Removal steps in this procedure may contain installation details.
WARNING:
Make sure to support the vehicle with axle stands.
Raise and support the vehicle.
Refer to: Fender Splash Shield (501-02 Front End Body Panels,
Removal and Installation).
Special Tool(s): JLR
© 2019-2026 Copyright www.lrdisc.com
