Land Rover Discovery: Diagnosis and Testing Speakers
PRINCIPLES OF OPERATION
For a detailed description and operation of the information and entertainment system, refer to the relevant description and operation section of the workshop manual.
INSPECTION AND VERIFICATION
CAUTION:
Diagnosis by substitution from a donor vehicle is NOT acceptable.
Substitution of control modules does not guarantee confirmation of a fault and may also cause additional faults in the vehicle being checked and/or the donor vehicle.
NOTES:
- If the control module or a component is suspect and the vehicle remains under manufacturer warranty, refer to the Warranty Policy and Procedures manual, or determine if any prior approval programme is in operation, prior to the installation of a new module/component.
- When performing voltage or resistance tests, always use a digital multimeter accurate to three decimal places, and with an up-todate calibration certificate. When testing resistance always take the resistance of the digital multimeter leads into account.
- All diagnostic equipment should comply with local legislation.
Relevant diagnostic equipment should be regularly checked and calibrated according to the manufacturer's instructions.
- The workshop should be equipped with a full range of general equipment which is to be kept in good order and available to all suitably trained staff.
- Diagnostic equipment must meet the JLR Minimum Standards for general equipment as outlined in TOPIx.
- Check and rectify basic faults before beginning diagnostic routines involving pinpoint tests.
- Verify the customer concern
- Visually inspect for obvious signs of damage and system integrity
Visual Inspection
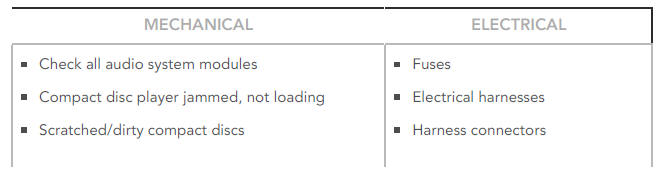
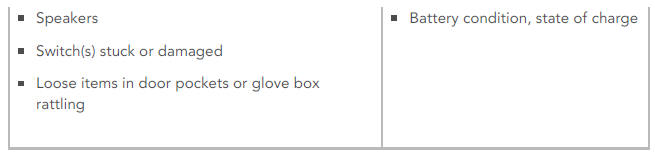
- If an obvious cause for an observed or reported concern is found, correct the cause (if possible) before proceeding to the next step
- If the cause is not visually evident, verify the symptom and refer to the Symptom Chart, alternatively check for Diagnostic Trouble Codes (DTCs) and refer to the DTC Index
- Check DDW for open campaigns. Refer to the corresponding bulletins and SSMs which may be valid for the specific customer complaint and carry out the recommendations as required
SPEAKER DIAGNOSTICS
The symptom chart below should be used when diagnosing speaker faults and must be worked through prior to replacing any speakers
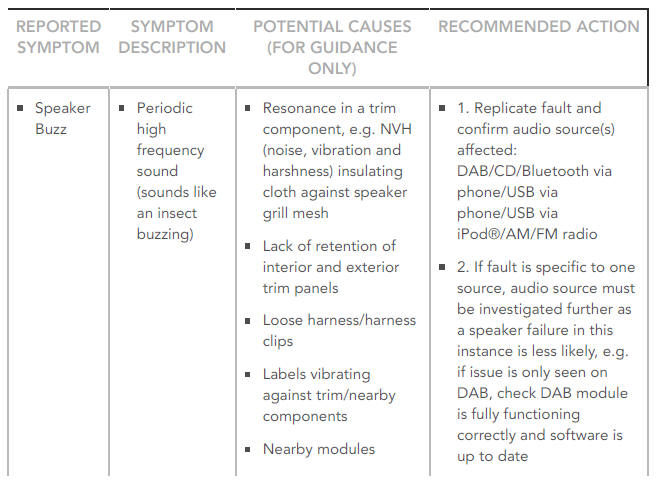
REPORTED SYMPTOM:
Speaker Buzz
SYMPTOM DESCRIPTION:
- Periodic high frequency sound (sounds like an insect buzzing)
POTENTIAL CAUSES (FOR GUIDANCE ONLY):
- Resonance in a trim component, e.g. NVH (noise, vibration and harshness) insulating cloth against speaker grill mesh
- Lack of retention of interior and exterior trim panels
- Loose harness/harness clips
- Labels vibrating against trim/nearby components
- Nearby modules vibrating against trim/BIW
- Mechanical failure of internal speaker component
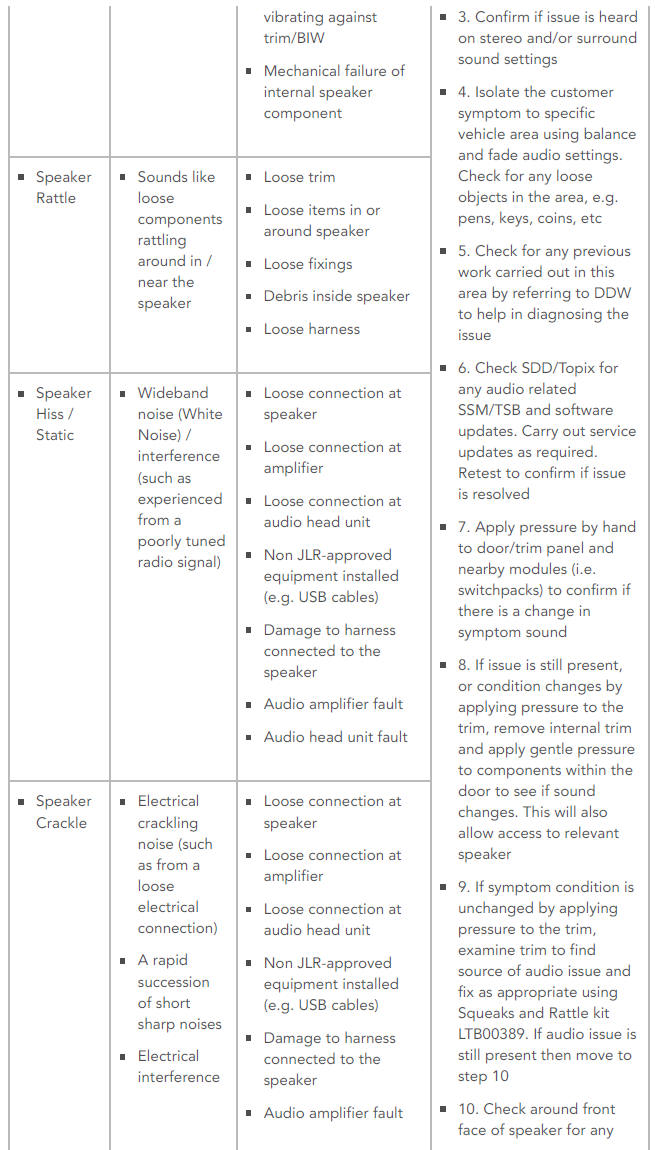
REPORTED SYMPTOM:
Speaker Rattle
SYMPTOM DESCRIPTION:
- Sounds like loose components rattling around in / near the speaker
POTENTIAL CAUSES (FOR GUIDANCE ONLY):
- Loose trim
- Loose items in or around speaker
- Loose fixings
- Debris inside speaker
- Loose harness
REPORTED SYMPTOM:
Speaker Hiss / Static
SYMPTOM DESCRIPTION:
- Wideband noise (White Noise) / interference (such as experienced from a poorly tuned radio signal)
POTENTIAL CAUSES (FOR GUIDANCE ONLY):
- Loose connection at speaker
- Loose connection at amplifier
- Loose connection at audio head unit
- Non JLR-approved equipment installed (e.g. USB cables)
- Damage to harness connected to the speaker
- Audio amplifier fault
- Audio head unit fault
REPORTED SYMPTOM:
Speaker Crackle
SYMPTOM DESCRIPTION:
- Electrical crackling noise (such as from a loose electrical connection)
- A rapid succession of short sharp noises
- Electrical interference
POTENTIAL CAUSES (FOR GUIDANCE ONLY):
- Loose connection at speaker
- Loose connection at amplifier
- Loose connection at audio head unit
- Non JLR-approved equipment installed (e.g. USB cables)
- Damage to harness connected to the speaker
- Audio amplifier fault
- Audio head unit fault
- Internal electrical issue in speaker
REPORTED SYMPTOM:
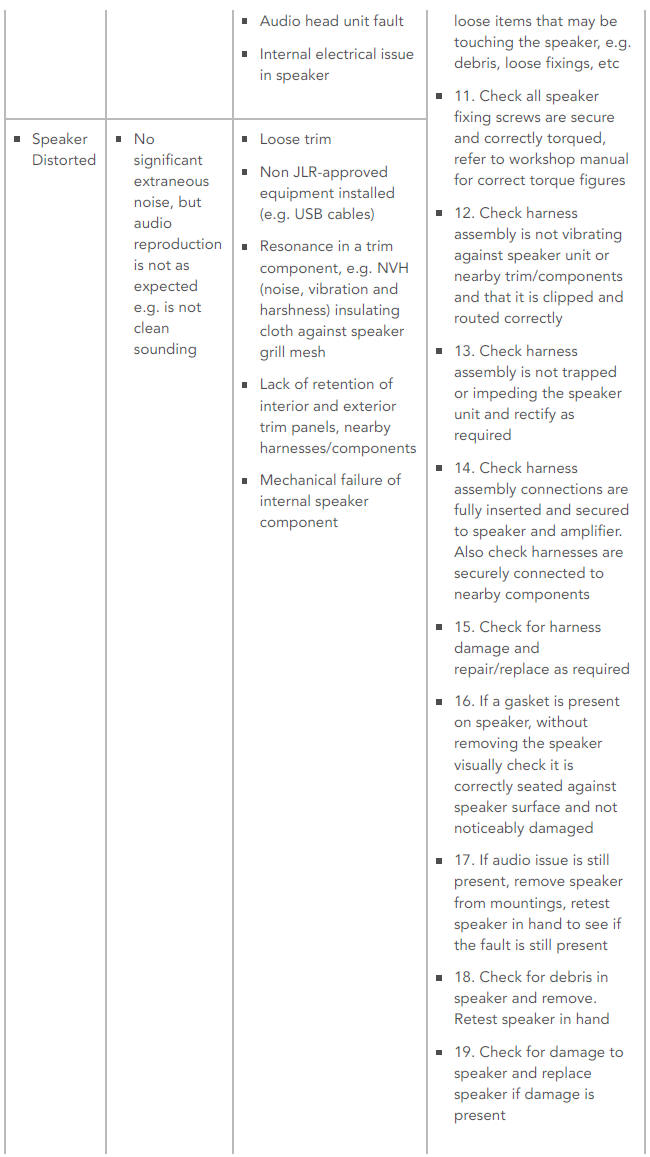
Speaker Distorted
SYMPTOM DESCRIPTION:
- No significant extraneous noise, but audio reproduction is not as expected e.g. is not clean sounding
POTENTIAL CAUSES (FOR GUIDANCE ONLY):
- Loose trim
- Non JLR-approved equipment installed (e.g. USB cables)
- Resonance in a trim component, e.g. NVH (noise, vibration and harshness) insulating cloth against speaker grill mesh
- Lack of retention of interior and exterior trim panels, nearby harnesses/components
- Mechanical failure of internal speaker component
RECOMMENDED ACTION
- Replicate fault and confirm audio source(s) affected: DAB/CD/Bluetooth via phone/USB via phone/USB via iPod/AM/FM radio
- If fault is specific to one
source, audio source must
be investigated further as
a speaker failure in this
instance is less likely, e.g.
if issue is only seen on DAB, check DAB module is fully functioning correctly and software is up to date
- Confirm if issue is heard on stereo and/or surround sound settings
- Isolate the customer
symptom to specific
vehicle area using balance
and fade audio settings.
Check for any loose objects in the area, e.g.
pens, keys, coins, etc
- Check for any previous work carried out in this area by referring to DDW to help in diagnosing the issue
- Check SDD/Topix for
any audio related
SSM/TSB and software
updates. Carry out service
updates as required.
Retest to confirm if issue is resolved
- Apply pressure by hand
to door/trim panel and
nearby modules (i.e.
switchpacks) to confirm if there is a change in symptom sound
- If issue is still present, or condition changes by applying pressure to the trim, remove internal trim and apply gentle pressure to components within the door to see if sound changes. This will also allow access to relevant speaker
- If symptom condition is unchanged by applying pressure to the trim, examine trim to find source of audio issue and fix as appropriate using Squeaks and Rattle kit LTB00389. If audio issue is still present then move to step 10
- Check around front
face of speaker for any loose items that may be
touching the speaker, e.g.
debris, loose fixings, etc
- Check all speaker fixing screws are secure and correctly torqued, refer to workshop manual for correct torque figures
- Check harness assembly is not vibrating against speaker unit or nearby trim/components and that it is clipped and routed correctly
- Check harness assembly is not trapped or impeding the speaker unit and rectify as required
- Check harness
assembly connections are
fully inserted and secured
to speaker and amplifier.
Also check harnesses are securely connected to nearby components
- Check for harness damage and repair/replace as required
- If a gasket is present on speaker, without removing the speaker visually check it is correctly seated against speaker surface and not noticeably damaged
- If audio issue is still present, remove speaker from mountings, retest speaker in hand to see if the fault is still present
- Check for debris in
speaker and remove.
Retest speaker in hand
- Check for damage to speaker and replace speaker if damage is present
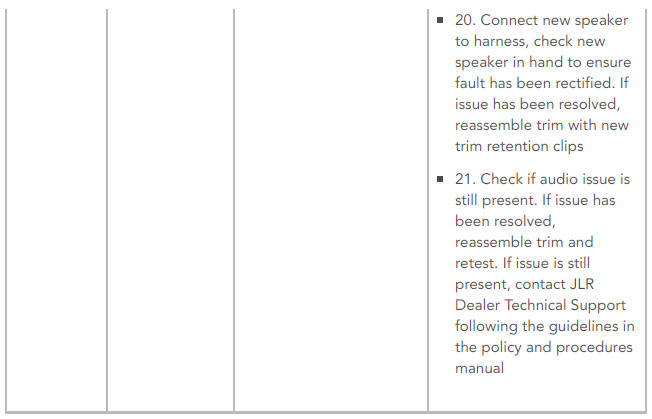
- Connect new speaker to harness, check new speaker in hand to ensure fault has been rectified. If issue has been resolved, reassemble trim with new trim retention clips
- Check if audio issue is still present. If issue has been resolved, reassemble trim and retest. If issue is still present, contact JLR Dealer Technical Support following the guidelines in the policy and procedures manual
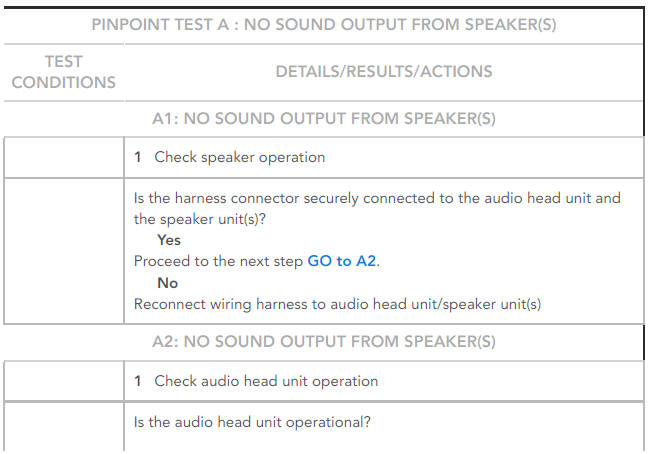
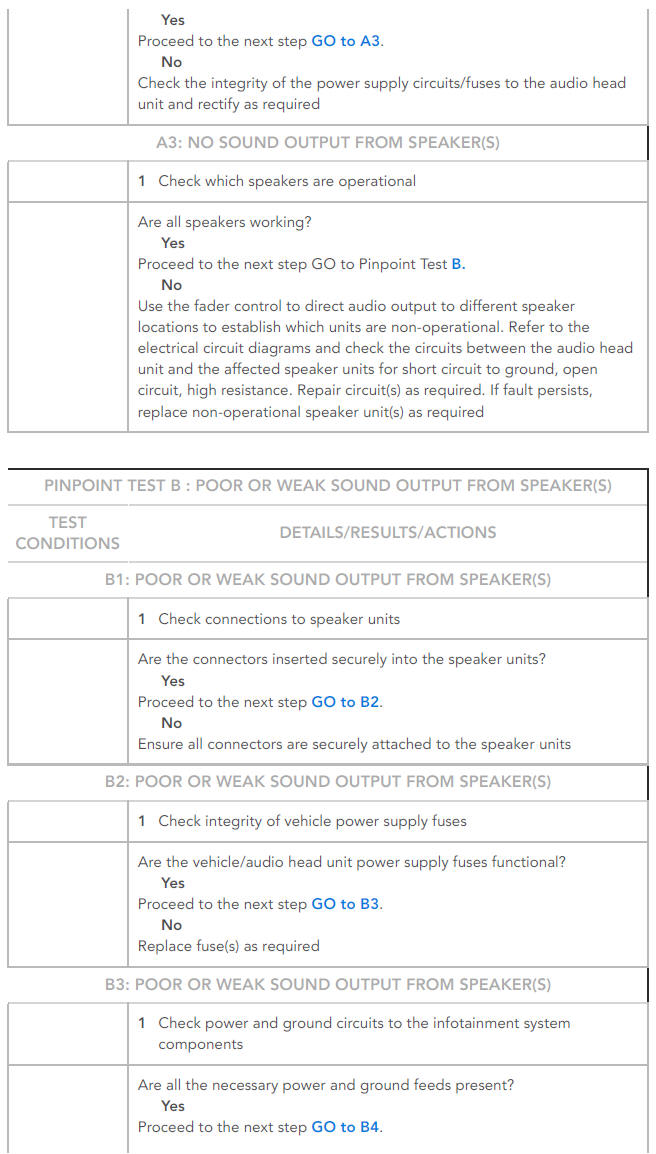
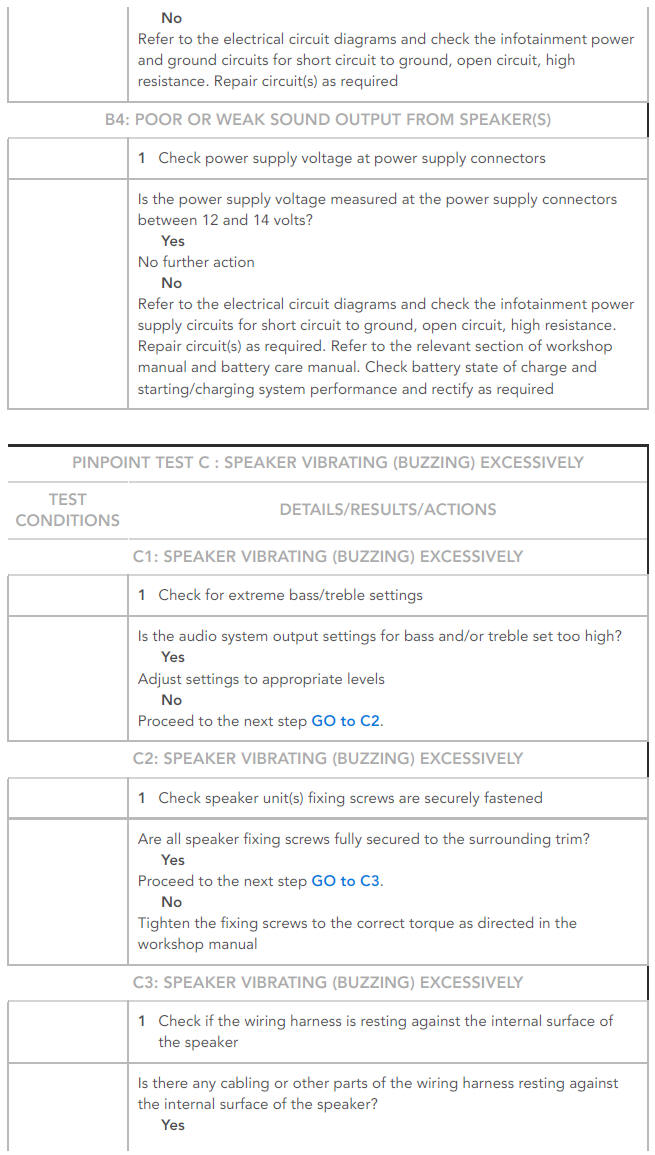
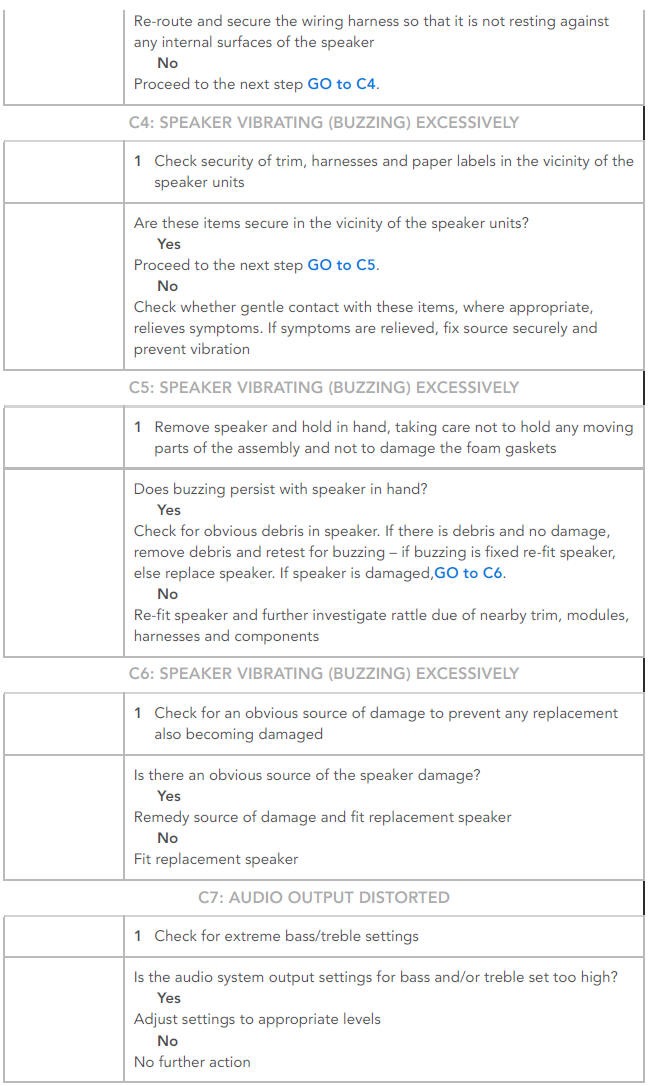
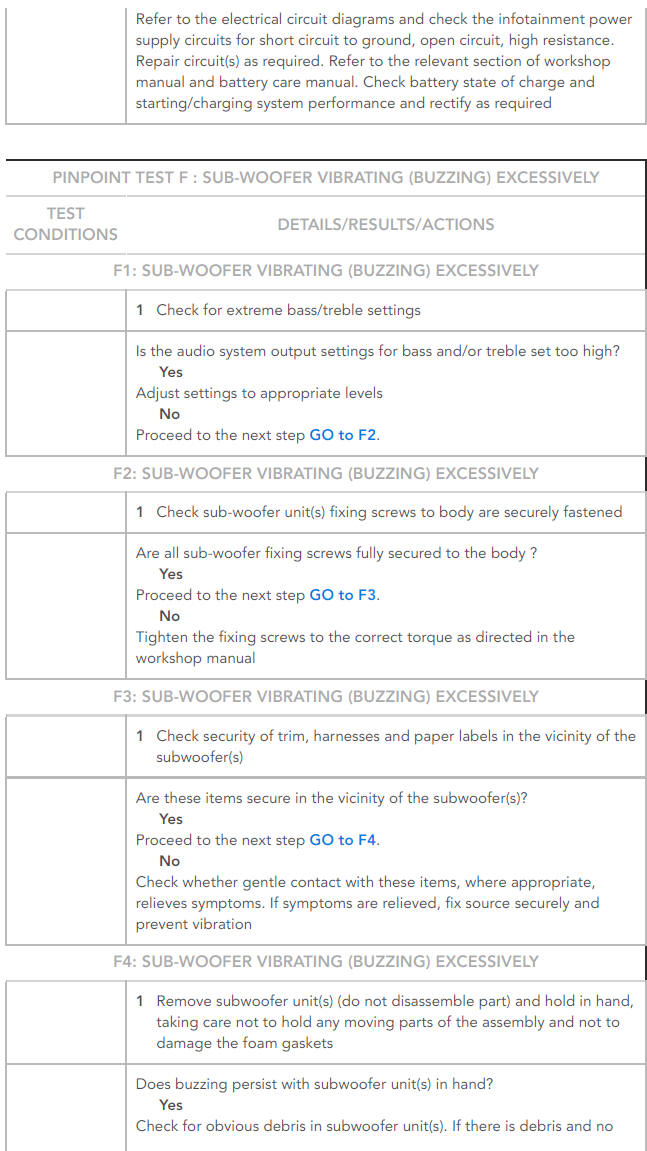
PINPOINT TESTS FOR SUSPECTED SPEAKER FAULTS
NOTE:
See separate Pinpoint Tests (below) for sub-woofer faults
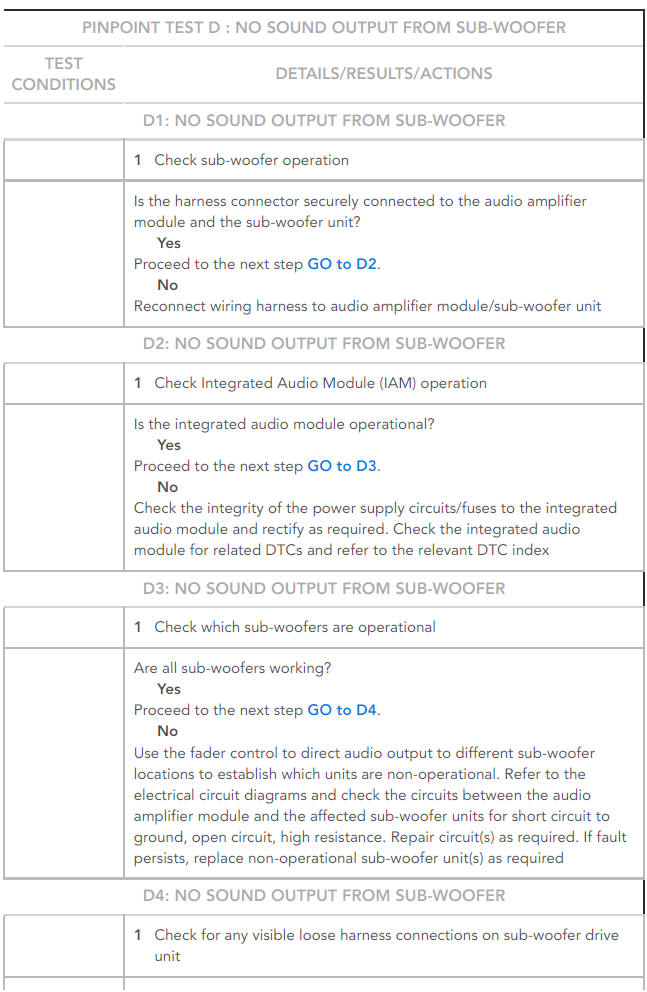
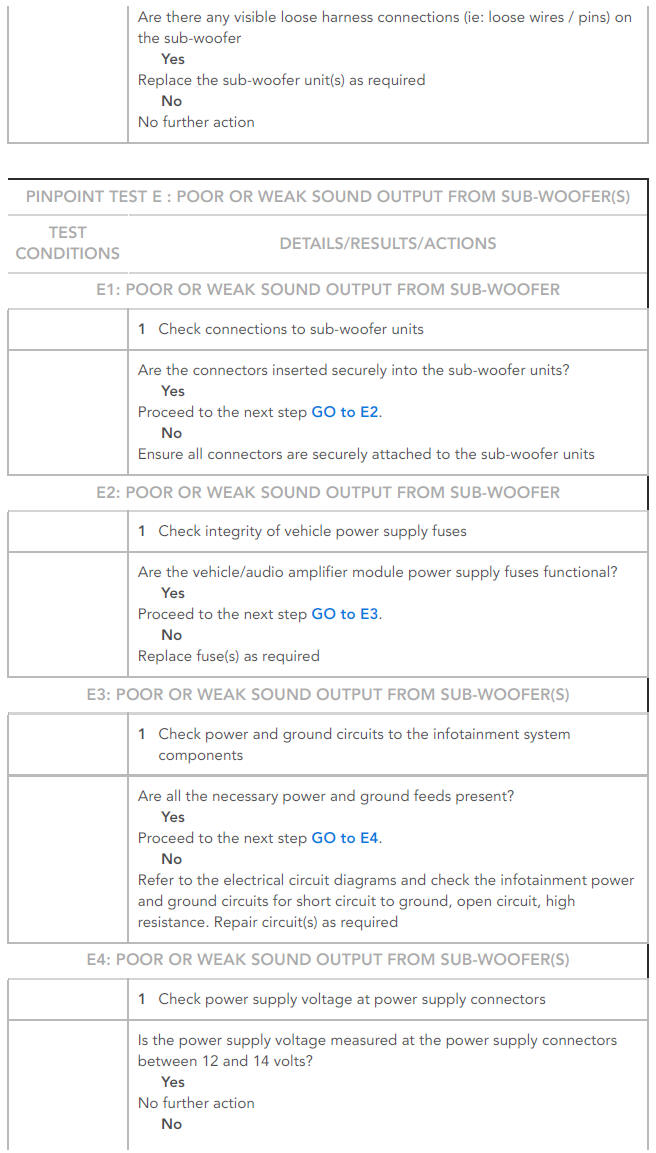
Pinpoint Tests For Suspected Sub-Woofer Faults
NOTE:
See separate Pinpoint Tests (above) for other speaker faults

DTC INDEX
For a list of Diagnostic Trouble Codes (DTCs) that could be logged on this vehicle, please refer to Section 100-00.
READ NEXT:
 Diagnosis and Testing Telematics
The complexities of the electronics involved with the telematics system, of
which the GPS antenna and navigation display are parts, and the
multiplexed communication network which are connected to it
Front Door Speaker (G1785139) / Removal and Installation
REMOVAL
NOTES:
Removal steps in this procedure may contain installation details.
RH illustration shown, LH is similar.
Refer to: Front Door Trim Panel (501-05 Interior Trim and
Ornamentation, Remo
General Information Incontrol Touch Software Update
ACTIVATION
NOTES:
The following must be adhered to when updating the software level
of the InControl Touch Audio Head Unit (AHU).
When attempting to update the software level on the InControl
Tou
SEE MORE:
Engine Emission Control - Ingenium i4 2.0l Diesel Low Pressure Exhaust Gas
Recirculation Cooler (G1875912) / Removal and Installation
PART(S)
REMOVAL
CAUTION:
Before disconnecting any components, make sure the area is clean
and free from foreign material. When disconnected all openings must
be sealed.
NOTES:
Some variation in illustrations may occur, but the essential
information is always correct.
Some components shown remov
Climate settings
To view the CLIMATE SETTINGS menu,
select Climate from the GENERAL
SETTINGS menu.
Auto Sensitivity: The air quality
sensor, for Automatic recirculation, can
be set to Low, Medium or High. Select
Off to disable Automatic recirculation.
Auto Power: The blower speed for
automatic operation can b
