Land Rover Discovery: Roof Sheet Metal Repairs Roof Rear Header Panel (G1770882) / Removal and Installation
Land Rover Discovery (2009–2016) Service Manual / Body / Body Repairs and General
Information / Roof Sheet Metal
Repairs Roof
Rear Header
Panel (G1770882) / Removal and Installation
REMOVAL
NOTE:
The roof rear header panel is installed in conjunction with:
- Headliner
- Roof moulding
- Side air curtain module
- Roof panel
- Roof rear panel
- Glass roof panel
- Liftgate
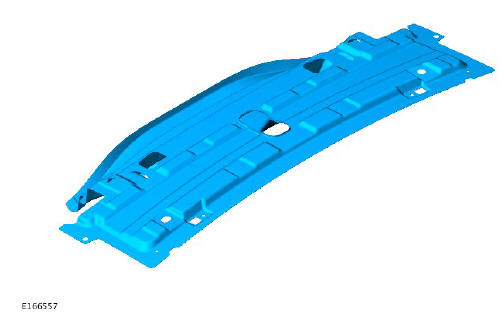
- The roof rear header panel is serviced as indicated.
- Before commencing this procedure make sure that you are aware of
all Health and Safety requirements.
For additional information, refer to: Health and Safety Precautions (100-00, Description and Operation).
- For further information on the methods, tools and fixings used in this procedure refer to the body repairs - general information section.
NOTES:
- Any joints sealed as part of vehicle manufacture must be sealed as part of the repair.
- Make sure a zinc rich primer is applied to any bare metal surfaces.
- For additional information, refer to: Headliner (501-05, Removal and Installation).
- For additional information, refer to: Roof Moulding - 5-Door (501- 08, Removal and Installation).
- For additional information, refer to: Side Air Curtain Module (501- 20B, Removal and Installation).
- For additional information, refer to: Roof Panel (501-28, Removal and Installation).
- For additional information, refer to: Roof Rear Panel (501-28, Removal and Installation).
- For additional information, refer to: Glass Roof Panel (501-11, Removal and Installation).
- For additional information, refer to: Liftgate (501-03, Removal and Installation).
- Release and position the wiring harness to one side.
- Remove the spot welds as indicated.
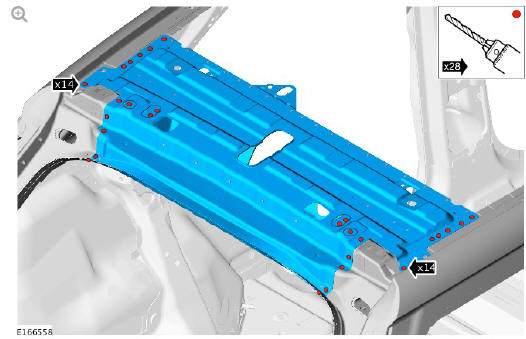
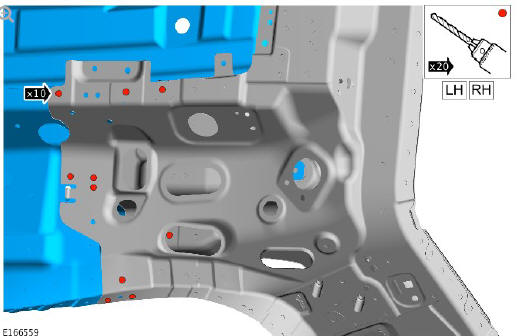
- Remove the spot welds as indicated.
- Carefully separate the joints and remove the roof rear header panel.
INSTALLATION
- Dress flanges where necessary.
- Clean and prepare the panel surfaces.
- Offer up the new roof rear header panel and clamp into position.
Check alignment, if correct, proceed to next step, if not rectify and recheck before proceeding.
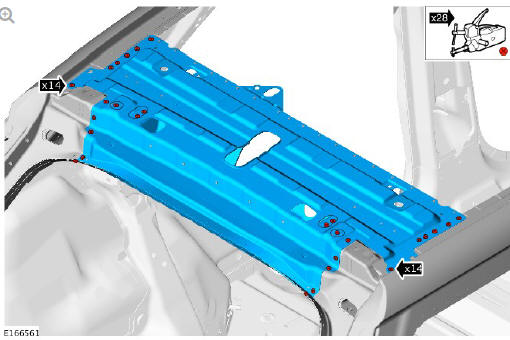
- Install the spot welds as indicated.

- Install the spot welds as indicated.
- Make sure that any open or exposed panel joints are sealed with a Land Rover recommended sealer.
- Make sure corrosion protection is applied to all areas affected by repair.
- The installation of associated panels and components is the reversal of removal procedure.
READ NEXT:
 Roof Sheet Metal
Repairs Roof
Panel (G1770876)
- Removal
Roof Sheet Metal
Repairs Roof
Panel (G1770876)
- Removal
NOTE:
The roof panel is installed in conjunction with:
Windshield
Headliner
Front seat
Rear seat cushion
Side air curtain module
Roof moulding
Liftgate
Antenna
The roof panel is serviced
Roof Sheet Metal
Repairs Roof
Panel (G1770876)
- Installation
Installation
NOTE:
SPR installation requires using the Land Rover approved SPR tool.
Dress the flanges where necessary.
Clean and prepare the panel surfaces.
Clean out the threads on the cap
SEE MORE:
Engine Speed and Torque
Monitoring
The ECM constantly supplies the TCM with information on engine speed
and torque through messages on the CAN powertrain systems bus. The
TCM uses this information to calculate the correct and appropriate timing of
shift changes.
If the messages are not received from the ECM, the TCM will implement a
Rear end Sheet Metal
Repairs Rear
Bumper Mounting
Lower (G1780739) / Removal
and Installation
REMOVAL
NOTE:
The rear bumper mounting lower is installed in conjunction with:
Rear bumper cover
Rear bumper
Rear lamp assembly
Rear lamp panel outer
Back panel outer
The rear bumper mounting lower is serviced as indicated.
Before commencing this procedure make sure that you are aware of
© 2019-2026 Copyright www.lrdisc.com
